들어가며
- 후디니는 SideFx사에서 만든 노드 기반 모델링 툴로써 절차적 모델링이 가능하다
- https://www.orbolt.com/search/?q=softpackage:Houdini

- point
- vertex
- primitive
- detail
조작키
Overview
| 마우스 | 좌클릭 + 이동 | 선택 |
| 우클릭 + 이동 | 줌 | |
| 휠클릭 + 이동 | 뷰 잡아서 이동 | |
| ALT 좌클릭 + 이동 | 복제 | |
| Enter | 핸들 보여주기 ( 노드 별 다름 ) | |
| 뷰모드 | Space | 토글 / 누른채로도 유지 가능 |
| F | 오브젝트 포커스 | |
| W | Wire 프레임 | |
| Shift + W | Shaded/Wire-overShaded | |
| D | 옵션 - Display Option | |
| Y | 고스트 오브젝트 하이드 토글 | |
| Ctrl + B | 뷰포트 전체화면 | |
| Space + B | 뷰포트 4분할 (씬 뷰) | |
| Space + G | 오브젝트 중심으로 줌 | |
| Ctrl + J | 토글 멀티 스냅핑 | |
| 선택모드 | S | 토글 |
| T | 움직임(Translate) | |
| R | 회전(Rotate) | |
| E | 스케일(scalE) | |
| 1 | Select - Object | |
| 2 | Select - Point | |
| 3 | Select - Edge | |
| 4 | Select - Primitive | |
| 드래그 | 선택 | |
| Shift + 드래그 | 선택 - 추가 | |
| Ctrl + 드래그 | 선택 - 해제 | |
| C | 메뉴 | |
| Ctrl + Shift + 2 / 3/ 4 | 선택 변경 | |
| 카메라 모드 | ESC | View Tool |
| Viewport | 1 | Viewport - perspective |
| 2 | Viewport - Top | |
| 3 | Viewport - Front | |
| 4 | Viewport - Right | |
| 5 | Viewport - UV | |
| CTRL + 1,2,3,4,5,6,7,8 | Viewport - 분할뷰 | |
| Pane | CTRL + W | Pane 닫기 |
| Pane | CTRL + B | Pane 최대/최소화 |
| ALT + [ | Pane 세로로 줄귿기 | |
| ALT + ] | Pane 가로로 줄귿기 | |
| ** ALT + 1 | 씬 뷰 | |
| ** ALT + 2 | 네트워크 뷰 | |
| ALT + 3 | 파라메터 | |
| ALT + 4 | 트리 | |
| ALT + 5 | 텍스트포트 (여기서는 알트 단축키 안먹음) | |
| ALT + 6 | 애니메이션 에디터 | |
| ALT + 7 | 머티리얼 | |
| ** ALT + 8 | 지오메트리 스프레드 시트 | |
| ALT + 9 | 렌더뷰 | |
| ALT + 쉬프트 + W | 새로운 창 |
X Snapping controls C The “Current” menu. You can choose the menu on this key using the Radial switching menu at the top of the main interface. V View controls
Object View
| Object View | |
|---|---|
| Y | 가위자르기 |
| J + 드래그 | 선따라 라인 생성 |
| P | 프로퍼티 보기 |
| U | 상위 노드로 이동 (Up) |
| O | 네트워크 오버뷰 |
| Z | 노드 모양 // Ctrl + 드래그로 기본 노드 모양 변경 가능 |
| C | 노드 색깔 // Ctrl + 드래그로 기본 노드 색깔 변경 가능 |
| A + 마우스 아레 | 노드 Layout 정렬. 노드 선택후 A키 누른상태에서 아래로 (https://siver.artstation.com/blog/zORm/houdini-blog-22-tips-and-tricks) |
| L | 노드 Layout 정렬. 선택한것들 Layout |
| Shift + L | 노드 Layout 정렬. 전체 Layout 정렬 |
| . | . |
| Shift + R | 입력 순서 교체 |
| Shift + S | 선 스타일 바꾸기 // wiring style change: rounded <-> straight |
| Shift + Z | 그룹보기 |
| Shift + O | Network Box |
| Shift + P | Sticky 노트 |
| Shift | Shft키를 누르고 노드를 움직이면 상위노드들도 같이 이동 |
| Shift + I | 이미지 추가 |
| Ctrl + I | Edit Background Images: Enable/Disable |
| Ctrl + F | 노드 찾기 |
| Alt | 선을 끌어당기고 있는 상태에서 이음 노드 추가. |
| Alt + 노드 드래그 | 노드 복사 |
| Shift + Ctrl + Alt + 노드 드래그 | 노드 레퍼런스 생성 |
| Page Up / Page Down | 윗노드 / 아랫노드 |
| Ctrl + 숫자 | 노드에 단축키 지정. 숫자로 이동가능하게 됨 |
| Q/B | 노랑색 Bypass |
| W | 진한 보라색 |
| E | 연한 보라색 미리보기 토글 |
| R | 파랑색 선택된것들 돌아가며 선택 |
| Composite View | |
|---|---|
| Shift + H | Fit To Viewport |
| ` / 1 / 2 / 3 / 4 | all / r / g / b / a 채널 |
Keyframe
alt
Ref
-
Ctrl + Alt + Shift + Click : Hotkey Manager
- Spreadsheet : Shift + B
-
Ctrl + Alt + S : tab menu 제거
-
Alt + P : timeline 축소
-
Ctrl + E : vex 편집창
-
Ctrl + 마우스 중간 : Revert To Default
-
Ctrl + Shift + 마우스 왼쪽 : Delete Channel
-
코드 폰트 확대 축소
- 확대: Ctrl +
+ - 축소: Ctrl +
-
- 확대: Ctrl +
Alt + 마우스 가운데 버튼 : Export Parameter to Type Properties
설정
houdini.env
C:\Users\pyoung\Documents\houdini19.5\houdini.env
# houdini.env
# https://www.sidefx.com/docs/houdini/basics/config_env.html
## Windows | %HOME%/houdiniX.Y/houdini.env
## Mac     | ~/Library/Preferences/houdini/X.Y/houdini.env
## Linux   | ~/houdiniX.Y/houdini.env

# EDITOR = "C:/Program Files/Microsoft VS Code/Code.exe -w"
환경변수
-
환경변수 확인
- Help > About Houdini > Show Details
| Env | |
|---|---|
| $HIPFILE | hip 파일 |
| $HIPNAME | hip파일의 확장명을 제외한 파일명 hello.hip => hello |
| $HIP | hip 파일이 저장된 절대경로 |
| $JOB | project 절대경로 ( File > New Project ) |
| $HFS | Houdini File System. The path where Houdini is installed. Houdini reads the configuration information from $HFS/houdini. |
| $HH | The path to Houdini supporting scripts and files inside $HFS. Usually $HFS/houdini |
| $HHP | The path to Houdini’s python libraries. This will differ depending on the version of python that Houdini is built with. For example $HH/python3.7libs. |
HOUDINI_OTLSCAN_PATH
| Aliases and Variables... | Alt+Shift+V |
Job
단축키
| Edit > Hotkeys | ||
|---|---|---|
| Copy Parameter | /Houdini/Panes/Parameter Fields and Labels | Ctrl+Shift+C |
| Copy Parameters | /Houdini/Panes/Parameter Spreadsheet | Ctrl+Shift+C |
| Paste Copied Relative Refs | Ctrl+Shift+V |
색상 조정
- 후디니> Edit > Color Setting > Color collection 확인
유닛 단위 조정
Edit > Preference > Hip File Options > Unit Length(m)
| 1 unit | |
|---|---|
| houdini | 1 meter |
| unity | 1 meter |
| unreal | 1 cm |
파일
| 분류 | 확장자명 | 설명 | LICENSE |
|---|---|---|---|
| 씬파일 | .hip | Houdini Independent Package | |
| .hiplc | Houdini Independent Package Limited Commercial | INDIE | |
| .hipnc | Houdini Independent Package Non-Commercial | EDUCATION / APPRENTICE | |
| 에셋 | .hda | Houdini Digital Assets | |
| .hdalc | Houdini Digital Assets Limited Commercial | INDIE | |
| .hipnc | Houdini Digital Assets Non-Commercial | EDUCATION / APPRENTICE | |
| 세션 | .hess | Houdini Engine SessionSync |
| storing Houdini geometry | |
|---|---|
| .geo | ASCII |
| .bgeo | binary |
| .bgeo.sc | compressed .bgeo file (using BLOSC compression). These are often as fast (or faster) to read/write than plain .bgeo files, and take less disk space. |
HDA
-
HDA
HoudiniDigitalAssets
-
OTL
OperatorTypeLibrary- https://www.sidefx.com/docs/hdk/_h_d_k__h_d_a_intro.html
- OTL은 여러 HDA를 포함할 수 있고, 스크립트 연산자와 같은 다른 연산자 정의도 저장할 수 있다
- https://www.andynicholas.com/post/hdas-or-otls
| 저장 | 노드 우클릭 > Save Node Type 혹은 Assets > Save Asset > 해당 에셋 |
| 락 풀기 | Allow Editing of Contents |
| 락 걸기 | Match Current Definition (주의 Revert와 같은거. Save Node Type 필수) |
| 속성 편집 | Type Properties |
File > Import > Houdini Digital Asset...
-
Transform.scale을 드래그해서 Edit Parameter Interface에 넣기
- Subnetnetwork는 추가 가능
- Null CONTROL에 넣으려고 하면 Node is outside subnet 라고 창이 뜨면서 추가가 안됨.
- 파라미터 추가 창에서 Forbid Linking Parameters from Outside this Subnet 을 체크 해제하면 추가 할 수 있음.
- HDA는 에는 사용 가능한것처럼 보이나 Type Properties 수정시 날라감.
-
파라미터 필드 추가 단축키
- alt + 마우스 중간 쿨릭
Type Property - Copy Default From Node 현재 노드에 셋팅된걸 디폴트로
- Introduction to HDA (Houdini Digital Asset) in Unreal Engine UE4 & Houdini for Beginners
- Foundation Module - All Lecture Series
Geometry Node
SOP
-
attr
-
기본
- sphere
- box
- grid
- tube // cone을 만들때도 사용
- rubbertoy
- tommy
- platonic(tetrahedron/cube/octahedron/icosahedron/dodecahedron/soccerball/utahteapot)
| 노드 | |
|---|---|
| Add | 점 추가 // 모델에서 점만 남기기, 점으로 선만들기 |
| Ends | Face/Hull 탭과 같은 기능. // Close U: Unroll with Shared Points로 면 없에기 |
| Peak | 노말 방향으로 이동 |
| Transform | 트랜스폼 - 전체/그룹 // Move Centeroid To Origin도 유용 |
| Edit | 트렌스폼 - 컴포넌트 단위 |
| Delete | 지우기 - 기능 더 많음 // 패턴 및 start/end // 중간에 있는 점의 노말을 살려야할시 v@N = cross(v@up, v@side) |
| Blast | 지우기 - 간단한 |
| Poly Extrude | 밀어내기(extrude), 그룹핑 가능 |
| Poly Bevel | 비스듬한면(bevel), 선에 점을 추가하여 아치형으로 변경 |
| Poly Path | 이어진 여러 라인을 하나의 라인으로 만듬. // 둘러싸여진 라인에서 면을 만듬 |
| Poly Frame | TangentName에 N을 넣는. TBN 구하기 // 선의 Tangent를 노말을 할당해서 노말이 선따라 가게. (N은 포인트 번호가 낮은 방향으로 향하게 된다) |
| Poly Fill | 채우기 |
| Poly Split | 자르기 - Edge Percentage가 유용 // 면을 자를때 좋음 |
| Poly Cut | 면없에기 // 선따기 좋음 |
| Poly Doctor | |
| Group | 그룹핑 - 추가 // 바운딩박스로도 그룹핑 가능(ex 가운데 점만 얻기) // 노말로 그룹핑(ex 상단 점들만) |
| Group Expression | 그룹핑 - 표현식으로 // Union with Existing |
| Group Delete | 그룹핑 - 삭제 |
| Group by Range | 그룹핑 - 범위 // Invert Range - 양끝점만 얻기 |
| Group Combine | 그루핑 - boolean연산 |
| Group Transfer | 그루핑 - override / distance threshold 유용 |
| Reverse | 노말 - 반대로 |
| Normal | 노말 - 스무스 효과 가능 Cusp Angle이 작을수록 하드, 클수록 소프트 |
| Boolean | 교집 - 교집합/합집합 |
| Clip | clipping - 반으로 자르는거 |
| ROP FBX Output | .fbx 내보내기 |
| ROP Geometry Ouput | 캐쉬 - 생성 $HIP/geo/$OS.bgeo.sc // $OS. Operator String 노드이름 // .obj내보내기 |
| File | 캐쉬 - 불러오기 |
| File Cache | 캐쉬 - 생성 / 불러오기 - 기능이 2개라 햇갈려서 잘 쓰지 않음 |
| Attribute Create | Attribute - 생성 // 그룹에 대한 attribute 생성도 가능 // $PR 할당할때 |
| Attribute from Map | Attribute - 이미지로부터 attribute를 가져옴 |
| Attribute Promote | Attribute - 포인트 어트리뷰트를 프리미티브 어트리뷰트로 변환하는것 처럼 서로 다른 클래스로 어트리뷰트 전환이 가능 |
| Attribute Transfer | Attribute - 이전. // condition을 이용해서 거리에 따른 Attribute를 가져올 수 도 있다. |
| Attribute Randomize | Attribute - 랜덤화 |
| Attribute VOP | Attribute - VOP 노드에는 자체는 키를 줄 수 없다 / VOP 노드 선택> VEX/VOP Options> Create Input Parameters |
| Scatter | 면에다 점찍기 |
| Triangulate | 포인트를 잘 연결해 트라이엥글로 만들어줌 |
| Triangulate 2D | 포인트를 잘 연결해 트라이엥글로 만들어줌 |
| Resample | 다시 표본화. 선에 점찍는 용도. Treat Polygons As - Subdivision Curves로 휘어짐을 표현할 수 도 있다 |
| Polywire | 와이어프레임 |
| Curve | 간단한, 베이지어 커브 // transform에서 bbox를 이용 살짝 올리고 height field에 ray랑 같이 써도 좋음 |
| Draw Curve | 그릴 수 있지만, 거칠기에 Smooth를 같이 써주는게 좋다. // Projection.Projection : Geometry도 있다 |
| Smooth | 완만하게 해주는거 커브, 리셈플이랑 주로 같이 쓰임 |
| Carve | 깍아내기 // uv로 선을 자름 |
| Sweep | 선따라 길만들기 // UVs and Attribute - Compute UVs 도 있으니 참고. //Construction - Target Up Vector에 Y Axis도 잘 활용 // 밧줄같은건 twist |
| Copy To Point | 포인트들 위치로 복사 // attribute 삭제되는거 주의 // Pack and Instance 로 입력 Geometry단위로 Primitive로 묶을 수 있음 |
| Copy And Transform | 갯수만큼 복사 // 테두리같이 뭔가 둘러싸는 걸 만들 때도 유용 / Match Size로 위치조정 |
| Foreach | https://www.youtube.com/watch?v=xs5WezgOZlo |
| Platonic Solids | Tetrahedron(4)/Cube(6)/Octahedron(8)/Icosahedron(20)/Dodecahedron(12)/Soccer ball(pentagonal b12 + w20)/Utah teapot |
| Iso Offset | Builds an offset surface from geometry. // 볼륨변환 // Scatter랑 같이 쓰이기도함 |
| Convert | 지오메트리 - 기하학을 변환(ex 폴리곤화) // 라인을 커브로 // LOD |
| Remesh | 지오메트리 - 메쉬 늘리기/줄이기 |
| Remesh to Grid | merge같이 합친후 하나의 메쉬 처럼 보이도록 할때 |
| Facet | 지오메트리 - 점 또는 표면 노말을 통합 // remove inline points로 resample한걸 합칠 수 있다. // post-compute normal로 노말만들때도 사용 |
| Fuse | 각 포인트들을 거리나 Snap에 따라 합치기. 프리미티브 가운데 찾기. Normal 다시 계산하는게 기본이므로 Remove Affected Normals 확인 하자. 라인을 Grid 스냅 가능 |
| Clean | 겹쳐진 primitive 삭제가능 |
| Divide | Don't Generate Slivers/Avoid Small Angles 동시 체크 추천. // Remove Shared Edge 엣지 지우면서 합치기 //Bricker Polygon으로 그리드도 가능 |
| linear taper | 오므라들게 |
| Match Size | Resizes and recenters the input geometry to match a reference bounding box. // Scale To Fit 유용 |
| Skin | 두 표면사이에 스킨을 씌워준다. // Keep primitives 로 원래 모양도 유지가능 |
| Sort | Point 나 Primitive를 정렬 혹은 랜덤 /. Shaft/Offset을 이용 오프셋 작업 가능Ï |
| Convert Line | 포인트끼리 연결한 라인 // Join 반대라고 생각하면 됨. |
| Object Merge | 외부 노드 불러오기 |
| Visualize Attribute | Attribute 기반 시각화 / TBN(rgb)을 시각화 시키면 좋다 / Type : Marker - Style : Vector |
| Pack | Pack하면 Point 1개와 Primitive 1개로 처리(foreach돌때 좋을듯) / 게임엔진에서 별도의 메쉬로 취급 |
| Unique Points/Point Split | Splits points shared by multiple vertices, optionally only if the vertices differ in attribute value. / PolyWire랑 쓰면 좋음 |
| Paint | 페인팅 |
| Point | 어트리뷰트 생성 ( point ) // 포인트에 Cd어트리 뷰트 생성시 유용 |
| Point Jitter | |
| Measure | area 계산 |
| Lattice | 공간 왜곡/휘기 |
| Dissolve | https://www.sidefx.com/docs/houdini/nodes/sop/dissolve |
| PolyExpand2D | 밖 혹은 안으로 (ex quad 확장/축소) |
| PolyReduce | LOD |
| PolyBridge | 떨어진걸 이어줌 // 이상하게 이어져 있으면 Paring - Interpolation : Linear 확인 |
| Bound | box/sphere/rectangle의 바운딩 박스를 만듬 |
| Extract Centroid | 센터 구하기 |
| exploded view | 쪼개서 넓히기 |
| subdivide | 나누기. // 선의 중앙점도 쉽게 구할 수 있다 |
| font | 텍스트 쓰기 text |
| Intersection Stitch | ex 선 겹칠때 접점을 기준으로 나누기. 교차로 |
| Primitive Properties | Primitive의 수치 조정. 각 프리미티브 회전 등등 |
| Distance along Geometry | https://www.sidefx.com/docs/houdini/nodes/sop/distancealonggeometry.html |
| Orientation Along Curve | 선따라 N 셋팅 |
| Labs Edge Group To Curve | 태두리 구하기 |
| Labs Dissolve Flat Edges | |
| Switch / Switch-If | |
| Labs Detail Mesh | uv한 오브젝트에 다른 패턴를 프로젝트하여 디테일을 살림 |
| helix | 나선 |
| Connect Adjacent Pieces | 점끼리 선이을때 // smooth랑 이용하면 거미줄같이 보임 |
Edge Straighten
shrinkwrap 랩핑하기 triangulate2d 랑 비슷한 Refine
Chain - Copy To Point랑 비슷한데 start/end 지정할 수 있음. Box Cutter : 박스모양으로 자름 Boolean이랑 비슷함 Physical Painter : 물체위에 물체붙이기 Thicken : 양옆으로 늘어나기 - poly extrude는 한쪽이지만
Labs Instance Attribute : 디버그용. xyz표시되는 gizmo가 유용하다 Labs symmetrize : mirror랑 비슷
Extract Silhouette Y축으로 하면 위에서 아래로 내려다 보는 (실루엣)면을 얻을 수 있음. Trace : Traces curves from an image file or heightfield. Texture Mask Paint 그림그릴때
| Merge | 합치기. 필요에 따라 Fuse를 뒤에 붙여 중복 제거 |
| Soft Transform | 부드러운 곡선 |
| Join | 선들 머지해서 연결작업(후처리)/선 끝을 서로 연결 // 떨어져있는 선 각각 프리미티브 합치기(Only Connected) |
| Mirror | 좌우 대칭. 라인 두개를 Skin하는 경우 Reverse: No Change 고려 할 것 |
| Revolve | 중심 축을 중심으로 곡선을 회전하여 표면을 만듬. (ex 유리잔) |
- NURBS(Non-uniform rational basis spline)
| foreach | |
|---|---|
| iteration | 0, 1, 2 ... |
| numiterations | 1, 2, 3 ... |
| ivalue | start + increment * iteration |
| value | start + increment * iteration |
| Primitive Type | |
|---|---|
| Primitive | |
| Polygon | 삼각형 |
| Polygon Mesh | 사각형 |
| Mesh | |
| NURBS | |
| Beizer | |
| Polygon Soup |
Attribute VOP
- Bind 노드로 attribute 노출 가능.
- Constant로 연산시 캐스팅 주의 ( int 1.0 + float 0.5 = int 1로 되어버리는 경우가 있음 )
Point From Volume 액체 제작할때 많이 사용. 단독=> Geo, VDB from Polygon => SDF, Iso Offset => Fog Iso Offset 연기
Particle Fluid Surface
DOP Network VDB
smoke / fire / pyro
Pop Network 시뮬레이션
POP Object POP환경에 맞게 일반 파티클 시스템을 동적 오브젝트로 변환. POP Solver 타임스탭에 맞게 파티클을 업데이트 POP Source generates particles from geometry.
etc
후면 틴트: Display Options: Markers / Primitives / Tint Backfaces Display Options : Guids / Origin gnomon
foreach
https://www.sidefx.com/docs/houdini/nodes/sop/block_begin.html https://www.sidefx.com/docs/houdini/nodes/sop/block_end.html
| Begin - Method | |
|---|---|
| Fetch Feedback | |
| Extract Piece or Point | |
| Fetch Metadata | 빈 지오메트리 |
| Fetch Input |
| End - Iteration Method | |
|---|---|
| By Piece or Points | |
| By Count | 반복 횟수 지정 |
| End - Gather Method | |
|---|---|
| Feadback Each Iteration | |
| Merge Each Iteration |
Decal Projector https://www.sidefx.com/docs/houdini/nodes/sop/labs--decal_projector.html
UV
| Seams 경계선 | |
|---|---|
| UV Autoseam | |
| Group |
| UV Create | |
|---|---|
| UV Project | 프로젝션 기법을 이용하여 UV 전개. 복잡한 봉같은 건 그룹(Boundary)로 자르고 원통형 Cylinder |
| UV Flatten | flattening constraints// Seam(이음매), Rectify(바로잡다) 잘 활용 |
| AutoUV | SideFXLab 에 통합됨 |
| UV Unwrap | 자동 uv 평탄화 및 구릅핑 |
| UV Texture | 평면은 물론, 구형이나 원통형을 UV 전개 |
| Sweep | |
| UV Pelt | |
| Labs UV Unwrap Cylinder |
| UV Editing | |
|---|---|
| UV Edit | |
| UV Transform | |
| UV Fuse | |
| UV Layout | uv 그룹 배치 - Scale Islands to Match Their Surface Areas |
| UV Smooth | |
| UV Brush | |
| Labs UV Unitize |
| Validation | |
|---|---|
| Labs UV Distortion | |
| Labs Calculate UV Distortion | |
| Labs UV Remove Overlap | |
| Labs Texel Density |
| Preview | |
|---|---|
| UV QuickShade | 평면 // grid 한장 |
| Labs UV Visualize | UV 시각화 // Visualize UV Islands / Visualize Seams도 있다 |
| Labs Export UV Wireframe |
sphere - uvproject (polar)
- UV Layout
- Connectivity
- Seperate Edges - 액자같은거 Group으로 edge잘라서
- Island Attribute - Copy같이 여러개 만들었을때 attribute 만들고 unpack (transfer attribute)하고
- Connectivity
udim https://www.sidefx.com/docs/houdini/solaris/udim.html UDIM is a system for dividing texture space into multiple “tiles” in UV space, with each tile represented by a separate texture file on disk.

- 1001 기준
- 1만큼 옆으로(U)
- 10만큼 위로(V)
Labs Automatic Trim Texture Labs Trim Texture
UV 펴기
Tube
- UV Project
- Projection: Cylindrical
- Translate: centroid(opinputpath(".", 0), D_X) | centroid(opinputpath(".", 0), D_Y) | centroid(opinputpath(".", 0), D_Z)
- Scale: ch("../main_shape/radscale") * 2 | ch("../main_shape/height") * 2 | ch("../main_shape/radscale") * 2
ref
Houdini Tutorial: Closed Sweep Spline and keep UVs
Step
| 점 추가 | Add |
| 모델에서 점만 남기기 | |
| 점으로 선만들기 | |
| 선에 점을 추가하여 아치형으로 변경 | PolyBevel |
배우기
- 카피 파라메터
- 인스펙터 수정
- 디스플레이뷰 점사이즈/숫자
아치형
- 그리드 1x1 // 2-2
- 그룹 @P.y > 0
- 베벌 distance 0.5
- 퓨즈
채우기
- 중심축을 정해 transform해서 띄워주고
- mirror - reverse normal : No
- skin
스크립트
| 종류 | 확장자 | 기타 |
|---|---|---|
| Python | .py | |
| VEX | .vlf/.vex | |
| expressions | 느림 | |
| HScript | 옛날꺼 |
VEX
- VEX(
VectorEXpressions)
| Vex | |
|---|---|
| vex | |
| h | #include<> 용 |
| vfl | Vex Function Library |
| pragma | vex 전용 pragma |
| ds | Dialog Script |
| houdini.env |
int assert_enabled() Returns 1 if the environment variable HOUDINI_VEX_ASSERT is set or 0 if the variable isn’t set. https://www.sidefx.com/docs/houdini/vex/assertions.html assert(1 == 2); assert(0 == 0);
에디터 설정
- Edit > Preference > Set External Text Editor
- VEXpression > 우클릭 > Expression > Edit in External Editor
- Visual Studio Code에 VEX 플러그인
// C:\Users\ (UserName) \Documents\houdini19.0\houdini.env

EDITOR = "C:\Users\(UserName)\AppData\Local\Programs\Microsoft VS Code\Code.exe"
노드
-
Attribute VOP
- Vex 시각화 그래프
-
Attribute Wrangle
- Vex 코딩
- Wrangle뜻
-
세미콜론(;) 붙여야함
-
주석
- //
- /* ... */
type@attribute
- geometry sheet에서 확인 가능
i@myint         = 5;                                        // i | int

f@myfloat       = 12.234;                                   // f | float
u@myvector2     = {0.6, 0.5};                               // u | vector2
v@myvector      = {1,2,3};                                  // v | vector
p@myquat        = {0,0,0,1};                                // p | vector4

2@mymatrix2     = {1,2,3,4};                                // 2 | matrix2
3@mymatrix3     = {1,2,3,4,5,6,7,8,9};                      // 3 | matrix3
4@mymatrix4     = {1,2,3,4,5,6,7,8,9,10,11,12,13,14,15,16}; // 4 | matrix

s@mystring      = 'a string';                               // s | string

d@mydict        = {};                                       // d | dict
d@mydict['key'] = 'value';

dict s = {};

i[]@connected_pts = neighbours(0, @ptnum);                  // i[] | int[] array

// 정의 후 @attribute 형태로 쓸 수 있다.
// { ... } 과 set( ... ) 는 동일.


// 배열이 좀 특이함
function int[] HelloWorld(int a[])
{
  int ret[];
  return ret;
}

// boolean형이 없네
vector x0 = point(0, "P", @ptnum);
vector x1 = point(1, "P", @ptnum);


float dist = distance(x0, x1);
vector dir = normalize(x1 - x0);
vector next = x0 + dir * (dist / 2.0f);

@P = next;
@
xx
@P                     => points
@N                     => normals
@Cd                    => primvars:displayColor
@id                    => ids
@width,@widths,@pscale => widths
@v                     => velocities
@w                     => angularVelocities
@accel                 => accelerations
@uv                    => primvars:st
@Alpha                 => primvars:displayOpacity


v@N; // the normal. If this hasn't been set, vex will calculate it for you just by calling it without initialised values
v@up; // a vector to control the spin around the normal when using instancing/copytopoints/etc
p@orient; // vector4 used as explicit rotation for instances
3@transform; // matrix3 used to control rotation and scale for instances
4@localtransform; // matrix (4x4) used for kinefx joints
f@pscale; // uniform scale for instances
v@scale; // XYZ scale control for instances

v@P; // current elements position. can be set for points, can be read for vertices and prims. Prims will guess the midpoint, not always reliable!
v@Cd; // diffuse colour
| @elemnum | 현재 element | @id |
| @vtxnum | 현재 vertex (linear) | 흔히 말하는 버텍스 |
| @ptnum | 현재 point | 포인트(중복된 포지션이 없다) |
| @primnum | 현재 primitive | 단일 엔티티(면 or 구 ...) |
| @numelem | 총 element 갯수 | |
| @numvtx | 총 vertex 갯수 | |
| @numpt | 총 point 갯수 | |
| @numprim | 총 primitive 갯수 |
| @Time | Float time ($T) |
| @Frame | Float frame ($FF) // $F는 int frame |
| @SimTime | Float simulation time ($ST), only present in DOP contexts. |
| @SimFrame | Float simulation frame ($SF), only present in DOP contexts. |
| @TimeInc | Float time step (1/$FPS) |
| $VTX | vertexprimindex(0, @vtxnum); |
geometry attribute
| Geometry | ||
|---|---|---|
| @id | int | A unique element ID |
| @name | string | 이름 |
| @P | vector | 포지션 |
| @N | vector | 노말 |
| @v | vector | 속도 Velocity |
| @piece | int | 조각 |
| @pscale | float | Uniform scaling factor |
| @scale | vector | Whereas pscale is a single uniform scaling factor in all axes |
| Rendering | ||
|---|---|---|
| @uv | vector | UV |
| Shader | ||
|---|---|---|
| @Cd | vector | diffuse 색깔 |
| @Cs | vector | specular 색깔 |
| @Cr | vector | reflect 색깔 |
| @Ce | vector | emission 색깔 |
| @Ct | vector | transmit 색깔 |
| @Alpha | float | Alpha transparency override. The viewport uses this to set the alpha of OpenGL geometry. |
| @rough | float | Roughness override. |
| @fresnel | float | Fresnel coefficient override. |
| @shadow | float | Shadow intensity override. |
| @sbias | float | Shadow bias override. |
| Particle | ||
|---|---|---|
| @orient | vector4 | Quaternion orientation of a particle |
| @up | vector | Represents the up vector of a particle’s local space |
| @rot | vector4 | An additional offset-quaternion applied after all other attributes |
ch
-
파라미터 삭제시: More > Delete Spare Parameter
| ch | |
|---|---|
| chf | float |
| chi | int |
| chv | vector |
| chramp(channel,ramppos, time) | 조절 가능한 2차원 그래프 채널이 생긴다 |
quaternion
vector4 orient = quaternion(maketransform(@N, @up));
vector euler  = quaterniontoeuler(orient,XFORM_XYZ);
v@rot = degrees(euler);
// maketransform: https://www.sidefx.com/docs/houdini/vex/functions/maketransform.html

vector4  quaternion(matrix3 rotations)
vector4  quaternion(float angle, vector axis)
vector4  quaternion(vector angleaxis)

vector  qrotate(vector4 quaternion, vector v)
vector  degrees(vector nums_in_rads)
vector  quaterniontoeuler(vector4 orient, int order)

vector4  slerp(vector4 q1, vector4 q2, float bias)

vector4  qmultiply(vector4 q1, vector4 q2)
| Constant name | Rotation Order |
|---|---|
| XFORM_XYZ | Rotate order X, Y, Z |
| XFORM_XZY | Rotate order X, Z, Y |
| XFORM_YXZ | Rotate order Y, X, Z |
| XFORM_YZX | Rotate order Y, Z, X |
| XFORM_ZXY | Rotate order Z, X, Y |
| XFORM_ZYX | Rotate order Z, Y, X |
| XFORM_TRS | Translate, Rotate, Scale |
Etc
point("../OUT_P", 0, "P", 1)  // OUT_P  노드의 0번째의 point P의 Y좌표(xyz / 012)
npoints(0) // 0번입력의 포인트 갯수
addpoint // removepoint
pointattrib - point랑 비슷한데 끝에 success받음. 네이밍이 조금 혼잡하네
setpointattrib
setpointgroup

opdigits(".")                 // 현재 노드(".")의 이름의 숫자만 가져옴
rand(x)                       // 랜덤. 분포가 일정하게 되는데 그럴때 사칙연산을 내부적으로 넣어주기도 함
rand(seed1, seed2)            // seed2가 있는데. 보통 rand(seed + 1)처럼 고유값을 갖기위한 패턴이 있는데 이걸 rand(seed, 1)처럼 쓸 수 있다.

chramp("radius_ramp", @curveu)    // 기어버튼으로 추가된 radius_ramp curveu의 위치 값을 가져온다
detail("../META/", "iteration", 0) // META에 있는 iteration의 0번째 값


prim("../OUT_Cd", 2, "Cd", 0) // OUT_Cd 노드의 2번째의 primitive Cd의 Red채널값(rgb / 012)
nprims(0) // 0번입력의 프라임 갯수
addprim  // removeprim
setprimattrib
setprimgroup

primintrinsic // Reads a primitive intrinsic from a geometry.

addvertex


getpointbbox_center(input)
| clamp(value, min, max) | |
| fit(value, fromMin, fromMax, toMin, toMax) | |
| point(geometry, attribute_name, pointnumber) | geometry는 입력 순서(0부터) |
| 포지션 - minpos(geometry, point) | point에서 geometry에 레이를 쐈을시 가장 먼저 닿는 부분의 포지션 |
| 포인트 - nearpoint(geometry, pt) | geometry에 있는 모든 point 중에서 pt와 가장 가까운 point의 번호 |
| Vector getbbox_size(geometry) | Computes the size of the bounding box for the geometry. |
getbbox_max
vector currP = @P;

// 현재 위치에서 1번 지오메트리와 맨 처음으로 마주치게될 포지션.
vector hittedP = minpos(1, currP);

// 현재 위치에서 1번 지오메트리에 있는 모든 포인트 중 가장 가까운 포인트번호.
int nearPointNumber = nearpoint(1, currP);

// 1번 지오메트리의 nearpointNumber의 _id값.
int id = point(1, "_id", nearPointNumber);
float xyzdist(geometry, originVector) primuv()
expression - opinputpath(name, index) : input에 연결된 노드의 경로 값을 가져옴 opinputpath(".", 0) 현재노드의 0번째(첫번째) 입력
@opinput‹n›_‹name› @opinput1_P // 입력 1의 P.
v@P = lerp(v@P, @opinput1_P, chf('blend'));
i@id = @ptnum // 현재 point v@P = lerp(v@P, point(1, 'P', findattribval(1, 'point', 'id', i@id)), chf('blend')); v@P = lerp(v@P, point(1, 'P', idtopoint(1, i@id)), chf('blend'));
v@pos = uvsample(0, 'P', 'uv', chv('uv'));
setdetailattrib(0, 'foo', @ptnum, 'set');
relpointbbox(2, pos); addpoint(geoself(), pos);
pointprims => point to prim
primpoints => prim to point primvertices
neighbours
pcfind 범위(radius)에서 포인트를 찾음 nearpoints // pcfind를 편히 쓸 수 있는 버전
pritnf/ sprintf
배열
insert / append removeindex removevalue push / pop resize len argsort reverse reorder find
Point Cloud
- https://www.sidefx.com/docs/houdini/vex/functions/pcopen.html
- point cloud에서는 원하는 정보만 가져올 수 있다.
- 반면, nearpoint는 포인트만.
// pcopen: int  pcopen(int opinput, string Pchannel, vector P, float radius, int maxpoints)

int pc_handle = pcopen(0, "P", @P, 1, 10);

if (pcnumfound(pc_handle) < 3)
{
    removepoint(0, @ptnum);
}

pcclose(pc_handle);
int pts[] = nearpoints(0, @P, 1, 10);

if (len(pts) < 3)
{
    removepoint(0, @ptnum);
}
pcimportbyidxf pcfilter pciterate pcfind pcimport pcnumfound
제어
if / for / while / break / continue / do while
foreach ([element_type] value; array) {

}

foreach (index, value; array) statement;
foreach (int index; element_type value; array) statement;
함수
int test(int a; int b; string c)
{
    return 1;
}
구조체
struct SHello
{
    int a = 1;
    int b;

    int Func()
    {
      return a;
    }
}

SHello x = SHello(1, 2);
문자열
startswith endswith find match concat join split lstrip / rstrip splitpath isdigit opdigits // Returns the integer value of the last sequence of digits of a string https://www.sidefx.com/docs/houdini/vex/functions/opdigits.html atoi / atof itoa
정규표현식
string regex = r''; i@match = re_match(regex, teststring); re_match re_find re_findall re_replace re_split
Random
https://www.sidefx.com/docs/houdini/vex/random.html
| Noise | Relative cost |
|---|---|
| Perlin noise (noise) | 1.0 |
| Original perlin noise (onoise) | 1.1 |
| Worley noise (wnoise) | 1.8 |
| Sparse Convolution noise (snoise) | 2.1 |
| Alligator noise (anoise) | 2.3 |
curlnoise flownoise
수학
fit lerp distance
| normalize | |
| cross | |
| abs | |
| dot | |
| length | |
| degree | |
| min / max | |
| sin/cos/acos |
| ceil | 올림 |
| floor | 내림 |
| rint | 반올림 |
| trunc | 버림 |
| frac | 소수점 부분만 |
Ref
-
sidefx
- https://www.sidefx.com/docs/houdini/vex/index.html
- https://www.sidefx.com/docs/houdini/vex/snippets.html
- https://www.sidefx.com/learn/vex/
- https://www.sidefx.com/docs/houdini/ref/expression_cookbook.html
- https://www.sidefx.com/docs/houdini/vex/lang.html
- https://www.sidefx.com/docs/houdini/vex/functions/index.html
-
tokeru
-
jtomori/vex_tutorial
https://sites.google.com/site/fujitarium/Houdini/sop/copy-sop
https://www.sidefx.com/docs/houdini/copy/instanceattrs.html
Python
-
https://www.sidefx.com/docs/houdini/hom/commandline.html#hython
-
A Pipeline in Thirteen Lines of Python | Sean Lewkiw | Lost Boys school of VFX | Montreal
-
환경변수 확인
- Help > About Houdini > Show Details
-
vscode
- Edit > Preferences > Set External Text Editor
- https://pakreht.com/houdini/configure-vscode-for-python/
- https://code.visualstudio.com/docs/python/settings-reference
- python.pythonPath - 하지만 지금은 Deprecated(더 이상 추천되지 않음) 상태입니다.
- python.defaultInterpreterPath **최근(2021년 이후)**에 도입된 설정입니다.
- "python.analysis.extraPaths" 비표준 위치에 설치된 패키지에 대해 IntelliSense를 활성화하려면 해당 위치를 파일 python.analysis.extraPaths의 컬렉션 에 추가하세요
- python.analysis.stubPath
- pylance
- https://marketplace.visualstudio.com/items?itemName=ms-python.vscode-pylance
- python.analysis.typeCheckingMode
- off: No type checking analysis is conducted; unresolved imports/variables diagnostics are produced.
- basic: All rules from off + basic type checking rules.
- standard: All rules from basic + standard type checking rules.
- strict: All rules from standard + strict type checking rules.
- python.analysis.typeCheckingMode
- https://marketplace.visualstudio.com/items?itemName=ms-python.vscode-pylance
-
편집: HDA 우클릭 > Edit Extra Sections Source Code > ViewerStateModule > Accept 버튼
# New Pane Tab Type > Python Shell
# ref: https://pakreht.com/houdini/configure-vscode-for-python/
# .vscode/setting.json

import sys
import pathlib
import json

pythonexe_path = pathlib.Path(sys.prefix).resolve().joinpath('python.exe')
sys_paths = [pathlib.Path(p).resolve() for p in sys.path]

vscode_settings = {}
vscode_settings["python.defaultInterpreterPath"] = pythonexe_path.as_posix()
vscode_settings["python.analysis.extraPaths"] = [p.as_posix() for p in sys_paths]
vscode_settings["python.analysis.stubPath"] = 'D:/REPLACE/WITH/YOUR/STUB/PATH'

print(json.dumps(vscode_settings, indent=4))
Windows > Hscript Textport(Alt + Shift + T)

/ -> help otedit
otedit

    REPLACED BY
      - hou.ui.openTypePropertiesDialog()
## hython path

Linux: /opt/hfs19.0.657/bin/hython
Windows: C:\Program Files\Side Effects Software\Houdini 19.0.657\bin\hython3.7.exe
// setting.json
"python.autoComplete.extraPaths" : [
  "C:/Program Files/Side Effects Software/Houdini 19.0.531/houdini/python3.7libs"
],

"python.autoComplete.preloadModules" : [
  "hou"
],

"python.analysis.extraPaths" : [
  "C:/Program Files/Side Effects Software/Houdini 19.0.531/houdini/python3.7libs"
]
- New Shelf...
- New Tool...
- Script
- New Tool...
import hou

obj = hou.node('/obj')
myGeo = obj.createNode('geo', 'myGeo')
box = myGeo.createNode('box', 'myBox')

# print(box.ascode())

box.parm('sizex').set(10)

selected = hou.selectedNodes() # tuple
selected[0].setInput(0, selected[1], 0)
import Pyside2 as ps
hou.playbar.play() hou.playbar.stop()
hou.ui.displayMessage("HelloWorld") hou.ui.displayMessage("HelloWorld", buttons=("OK", "NO")) hou.ui.readInput("Read Input")
hou.frame() hou.fps()
hou.selectedNodes()
hou.putenv("ENV_A", "VALUE_A") hou.unsetenv('A') hou.getenv("HIP") hou.hda.reloadAllFiles()
hou.hscript("opparm /obj/geo1 scale 10")
n = hou.node("/obj/geo1") sphere = n.node("sphere1")
node.parent() node.children() node.outputs() node.inputs() node.setInput(2, otherNode) node.setInput(2, None) node.color() node.setColor(hou.Color(1, 0, 0)) node.setDisplayFlag(False) node.isGenericFlagSet(hou.nodeFlag.Display) node.setGenericFlagSet(hou.nodeFlag.Display, True) // https://www.sidefx.com/docs/houdini/hom/hou/nodeFlag.html
node.type() node.createNode('attribwrangle')
node.userDataDict() node.clearUserDataDict() node.setUserData('keyString', 'valueString') node.userData('keyString') node.destroyUserData('keyString')
https://www.sidefx.com/docs/houdini/hom/hou/OpNode.html#user-data node.cachedUserDataDict() node.setCachedUserData('keyString', 'valueString') node.cachedUserData('keyString') node.destroyCachedUserData('keyString')
node.asCode()
node.name() node.setName('test') node.commnet() node.setComment('comment') node.appendComment('append comment') node.path() node.position() node.setPosition((0, 0)) // input : vector node.move((-1, -1)) node.destroy() node.evalParm('proj')
// https://www.sidefx.com/docs/houdini/ref/env.html
// https://www.sidefx.com/docs/houdini/hom/locations.html#startup

HH                    : The path to Houdini supporting scripts and files inside $HFS. Usually $HFS/houdini
HOUDINI_PATH          : The path of directories where Houdini looks for configuration files.
HOUDINI_USER_PREF_DIR : The directory to store user preference files.
hou.parm ("/obj/geo1/tx") hou.parm ("/obj/geo1/scale") hou.parmTuple("/obj/geo1/t") p = hou.parm ("/obj/geo1/scale") p.eval() p.evalAsString() p.isTimeDependent() p.evalAtFrame(10) p.set(5) p.name() p.node() p.pressButton() p.keyframes() p.keyframesAfter(20) p.deleteAllKeyframes() p.revertToDefault() p.expression() p.expressionLanguage() p.setExpression('print "Hello"', language=hou.exprLanguage.Python)
node = hou.pwd() geo = node.geometry() geo.points() pt = geo.iterPoints()[0] pt.prims() pt.vertices() geo.attribValue('foo') geo.setGlobalAttribValue('foo', 5) pt.attribValue('foo') pt.setAttribValue('foo', 5) geo.addAttrib(hou.attribType.Prim, 'myattrib', 0.0, create_local_variable=False)
pts = geo.createPoints([(0, 0, 0)]) geo.deletePoints(pts)
group = geo.findPointGroup('grp1') group = geo.createPointGroup('grp1') group.clear() group.destroy()
p = geo.prim(0) p.intrinsicValue('typename')
hou.ui.displayMessage("HelloWorld", serverity=hou.serverityType.ImportantMessage, help='help message', detail='detail','title='title') hou.ui.readMultiInput('wtf', ('1', '2', '3')) hou.ui.selectFile() hou.ui.selectFromList(('1', '2', '3')) hou.ui.selectFromTree(('a/1', 'a/2', '3')) hou.ui.selectNode() hou.ui.selectParm() hou.ui.selectParmTuple() hou.ui.selectAttrib() hou.ui.selectColor() hou.ui.setStatusMessage('hello world')
import hou n = hou.node('/obj/hello') t = n.type() d = t.definition() group = d.parmTemplateGroup() group = hou.ParmTemplateGroup() n.setParmTemplateGroup() d.setParmTemplateGroup()
import hou
n = hou.node('/obj/geo1/transform1')

new_n = n.parent().createNode(n.type().name(), f"{n.name()}_refcopy")
new_n.setPosition(n.position())
new_n.move((0.5, -0.5))
new_n.setColor(hou.color((0.1, 0.1, 0.1)))

group = new_n.parmTemplateGroup()
source = hou.StringParmTemplate('ref_source', 'Reference Source', 1, string_type=hou.stringParmType.NodeRefernece, help='help text')
group.insertBefore((0, ), source)
new_n.setParmTemplateGroup(group)
new_n.parm('ref_source').set(n.path())

temp_list = [
  hou.parm('obj/geo1/transform1_refcopy/scale'),
  hou.parm('obj/geo1/transform1_refcopy/group'),
  hou.parm('obj/geo1/transform1_refcopy/shear')
]
for p in temp_list:
    if p.name() == 'ref_source':
        continue
    if p.parmTemplate().type() == hou.parmTemplateType.Folder:
        continue
    if p.parmTemplate().type() == hou.parmTemplateType.FolderSet:
        continue

    mode = kwargs['ctrlclick']

    if mode:
        expr = 'ch'
        if p.parmTemplate().type() == hou.parmTemplateType.String:
            expr = 'chs'
        p.setExpression(f"{expr}(chs('ref_resource') + '/{p.name()}')")
    else:
        p.setExpression(f"hou.node(hou.pwd().evalParm('ref_source')).evalParm('{p.name()}')", language=exprLangauge.Python)
PythonModule def onInputChanged OnInputChanged kwargs['node'].hm().onInputChanged(kwargs) # hm - a shortcut for self.hdaModule().
hou.phm().SomeFunction() # hou.phm() == hou.pwd().hdaModule() https://www.sidefx.com/docs/houdini/hom/hou/phm.html https://www.sidefx.com/docs/houdini/hom/hou/HDAModule.html
HOM
- HOM - Houdini Object Model
- 이벤트 https://www.sidefx.com/docs/houdini/hom/state_events.html
- 컨텍스트 메뉴: https://www.sidefx.com/docs/houdini/hom/state_menus.html
- Drawable: https://www.sidefx.com/docs/houdini/hom/state_guides.html
- 핸들: https://www.sidefx.com/docs/houdini/hom/state_handles.html
- 파라미터: https://www.sidefx.com/docs/houdini/hom/state_parameters.html
- HUD: https://www.sidefx.com/docs/houdini/hom/hud_info.html
- Drag & Drop: https://www.sidefx.com/docs/houdini/hom/state_dragdrop.html
- Undo : https://www.sidefx.com/docs/houdini/hom/state_undo.html
Tool scripts https://www.sidefx.com/docs/houdini/hom/tool_script.html
x
- https://www.sidefx.com/tutorials/houdini-cable-tool-with-python-viewer-states/
- Writing custom viewer states in Python
- 상태등록
- Houdini는 시작 시 createViewerStateTemplate상태 템플릿에 접근하여 등록을 수행합니다.
- viewerstate.utilsHoudini는 뷰어 상태 설치를 지원하고 사용자가 직접 상태를 구현할 수 있도록 다양한 문서화된 유틸리티 함수와 클래스를 포함하는 Python 모듈을 제공합니다.
- 이 모듈은 $HHP/viewerstate폴더 아래에 있습니다.
class MyState(object):
  # 생성자는 필수
  def __init__(self, state_name, scene_viewer):
        self.state_name = state_name
        self.scene_viewer = scene_viewer

# Event Handler
#
## Life Cycle
#
# onEnter
# onInterrupt
# onExit
# onResume
# onGenerate
#
## UI
#
# onMouseEvent
# onMouseDoubleClickEvent
# onMouseWheelEvent
#
# onKeyEvent
# onKeyTransitEvent
#
# onMenuAction
# onMenuPreOpen
#
# onParmChangeEvent
# onPlaybackChangeEvent
# onCommand
#
## Handle
#
# onHandleToState
# onStateToHandle
# onBeginHandleToState
# onEndHandleToState
#
## Selection
#
# onStartSelection
# onSelection
# onStopSelection
# onLocateSelection
#
## Drawing
#
# onDraw
# onDrawInterrupt
#
## Drag & Drop
#
# onDragTest
# onDropGetOptions
# onDropAccept
#

def createViewerStateTemplate():
    state_typename = kwargs["type"].definition().sections()["DefaultState"].contents() # Edit Operator Type Properties > Node > Default State
    state_label = "Label"
    state_cat = hou.sopNodeTypeCategory()

    template = hou.ViewerStateTemplate(state_typename, state_label, state_cat)
    template.bindFactory(MyState)
    template.bindIcon(kwargs["type"].icon())

    return template
- 스크립팅 : Edit Operator Type Properties > Interactive > State Script > New...
- 디버그창 : New Pane Tab Type > Inspectors > Viewer State Browser
- 디버그
- scene_viewer.setPromptMessage # 말 그대로 씬 뷰어 https://www.sidefx.com/docs/houdini/hom/hou/SceneViewer.html
- self.log # => Viewer State Browser
- print() # => 메시지창
ui_event = kwargs["ui_event"] https://www.sidefx.com/docs/houdini/hom/hou/UIEvent.html ui_event = kwargs["ui_event"] reason = ui_event.reason() # https://www.sidefx.com/docs/houdini/hom/hou/uiEventReason.html dev = ui_event.device() # https://www.sidefx.com/docs/houdini/hom/hou/UIEventDevice.html self.log("Mouse:", dev.mouseX(), dev.mouseY(), dev.isLeftButton())
geometry = self._node.geometry(0) https://www.sidefx.com/docs/houdini/hom/hou/Geometry.html intersected = geometry.intersect(origin, direction, position, normal, uvw)
state_parms = kwargs["state_parms"] 바인딩된 파라미터 https://www.sidefx.com/docs/houdini/hom/state_parameters.html#binding-the-parameter
패키지 파일을 이용한 환경 변수 설정
$HOUDINI_USER_PREF_DIR/packages/PythonStateCourse.json를 사용하여 PYSTATECOURSE 환경변수 정의
// https://www.sidefx.com/docs/houdini/ref/plugins.html
{
	"path": "$PYSTATECOURSE",
	"load_package_once": true,
	"env": [
		{
			"PYSTATECOURSE": "C:/Users/pyoung/Downloads/GumroadPythonStatesforHoudiniTDs/course"
		}
	]
}
PYSTATECOURSE환경 변수에 정의된 경로를 이용하여 viewer_states 등록 C:/Users/pyoung/Downloads/GumroadPythonStatesforHoudiniTDs/course/viewer_states/nodelsss_state_example.py - viewer_states폴더 (이름 주의)
import hou
import viewerstate.utils as su

class State(object):
    def __init__(self, state_name, scene_viewer):
        self.state_name = state_name
        self.scene_viewer = scene_viewer


def createViewerStateTemplate():
    """ Mandatory entry point to create and return the viewer state
        template to register. """

    state_typename = "course::nodeless_state_example::1.0"
    state_label = "1 Course - Nodeless State Example"
    state_cat = hou.objNodeTypeCategory()

    template = hou.ViewerStateTemplate(state_typename, state_label, state_cat)
    template.bindFactory(State)
    template.bindIcon("MISC_python")
    return template
- 디버그창 : New Pane Tab Type > Inspectors > Viewer State Browser
- 1 Course - Nodeless State Example 우클릭 Enter버튼
-
툴바
- 파라미터에서 Show Parm In > Main & Tool Dialogs + ToolBox로 노출 가능
- 아니면 python코드에서 template.bindParameter(...) 사용해서 노출가능
-
Python은 Compile Block에서 사용할 수 없어 Invoke노드에서 호출이 안됨
- Network View Display Options > Context Specific Badge > Non-compilable SOP Badge > Normal (기본값 Hide)
- Invoke Compiled Block
- Compile Block: 여기는 Compile Block의 End부분이 들어가야함
- Input Name: 여기는 Compile Block의 Begin부분에서 Input Name과 맞춰주면 됨
- Compile Block
- Input Name:
도로의 크기&회전 조절
Edit Operator Type Properties > Parameters

- p_shift Integer
- p_json  String
- p_reset Button
# 버튼 > Callback script
# hou.pwd().hm().reset(kwargs)

# Edit Operator Type Properties > Scripts - Event Handler가 Python Module인거 확인
import json

def reset(kwargs):
    node = kwargs["node"]

    npoints = 0
    geo = node.geometry()
    if geo:
        npoints = geo.attribValue("handles")

    json_list = [{"banking": 0, "scale": 0} for _ in range(npoints)]
    json_parm = node.parm("p_json")
    json_parm.set(json.dumps(json_list))
# Edit Operator Type Properties > Interactive > State Script > New...
import hou
import json
from typing import TypedDict

class Item(TypedDict):
    scale: float
    banking: float

class Util:
    @staticmethod
    def clamp(x: int, min_val: int, max_val: int) -> int:
        return max(min_val, min(x, max_val))

class State(object):

    MSG = "Click and drag to rotate, hold shift to scale"

    def __init__(self, state_name, scene_viewer):
        self._state_name = state_name
        self._scene_viewer = scene_viewer

        self._node = None
        self._p_shift: int = 0
        self._p_json: str = ''

        self._json_list: list[Item] = [] # [{"banking": 0, "scale": 0}, ...]
        self._selected_pt_num: int = -1
        self._mouse_x_start: int = 0
        self._offset_sign: int = 1

    def onEnter(self, kwargs):
        self._node = kwargs["node"]
        self._p_shift = self._node.parm("p_shift") # hda 파라미터 이름
        self._p_json = self._node.parm("p_json")   # hda 파라미터 이름

        self._scene_viewer.setPromptMessage(State.MSG)

        geo = self._node.geometry(0)
        npoints = 0
        if geo:
            npoints = geo.attribValue("handles")

        json_str = self._p_json.eval()
        if not json_str:
            self._json_list = self._resize([], npoints)
            return

        loaded = json.loads(json_str)
        self._json_list = self._resize(loaded, npoints)

    def _resize(self, lst: list, cnt: int) -> list:
        diff: int = len(lst) - cnt
        if diff < 0:
            return lst + [Item(scale= 1, banking= 0) for _ in range(abs(diff))]
        elif diff > 0:
            return lst[:cnt]
        else:
            return lst

    def onMouseEvent(self, kwargs):
        ui_event = kwargs["ui_event"]

        reason = ui_event.reason()
        dev = ui_event.device()
        # self.log("Mouse:", dev.mouseX(), dev.mouseY(), dev.isLeftButton())

        if reason == hou.uiEventReason.Start:
            self._mouse_x_start = dev.mouseX()

            geo = self._node.geometry(0)
            origin, direction = ui_event.ray()
            position = hou.Vector3()
            normal = hou.Vector3()
            uvw = hou.Vector3()
            intersected = geo.intersect(origin, direction, position, normal, uvw)

            if intersected == -1:
                self._selected_pt_num = -1
                return False

            prim = geo.prim(intersected)
            self._selected_pt_num = prim.attribValue("pt_num")
            normal = prim.floatListAttribValue("direction")
            normal = hou.Vector3(normal)
            angle = direction.angleTo(normal)
            if angle < 90:
                self._offset_sign = 1
            else:
                self._offset_sign = -1
            return False

        if reason == hou.uiEventReason.Active:
            if self._selected_pt_num == -1:
                return False

            x_offset = dev.mouseX() - self._mouse_x_start
            self._mouse_x_start = dev.mouseX()
            pt_dict: Item = self._json_list[self._selected_pt_num]

            if self._is_shift():
                next_scale = pt_dict["scale"] + x_offset
                pt_dict["scale"] = Util.clamp(next_scale, -800, 5000)
            else:
                next_banking = pt_dict["banking"] + (self._offset_sign * x_offset)
                pt_dict["banking"] = next_banking
            # self._json_list[self._selected_pt_num] = pt_dict
            json_str = json.dumps(self._json_list)
            self._p_json.set(json_str)

        # Must return True to consume the event
        return False

    def onKeyTransitEvent(self, kwargs):
        ui_event = kwargs["ui_event"]

        if ui_event.device().isShiftKey():
            self._p_shift.set(1)
        else:
            self._p_shift.set(0)
        # Must returns True to consume the event
        return False

    def _is_shift(self) -> bool:
        return self._p_shift.evalAsInt() == 1


def createViewerStateTemplate():
    state_typename = kwargs["type"].definition().sections()["DefaultState"].contents()
    state_label = "P3tpr subnet1"
    state_cat = hou.sopNodeTypeCategory()

    template = hou.ViewerStateTemplate(state_typename, state_label, state_cat)
    template.bindFactory(State)
    template.bindIcon(kwargs["type"].icon())

    return template

## dataclass도 고려해봤지만, 이건 내장 json로더가 손이 간다.
## Interactive쪽에만 코드를 짜면 dataclass를 어찌 집어넣을 수 있겠지만, python노드에서 로더부분을 건드리면 비용이 배가 될것이다.
## import dataclasses
##
## class JSON(json.JSONEncoder):
##     def default(self, o):
##         if dataclasses.is_dataclass(o):
##             return dataclasses.asdict(o)
##         return super().default(o)
##
##     @staticmethod
##     def to_str(o: object) -> str:
##         return json.dumps(o, cls=JSON)
##
## @dataclasses.dataclass
## class Item:
##     scale: float
##     banking: float
##
## def load_items(json_str: str) -> list[Item]:
##     data = json.loads(json_str)
##     return [Item(**item) for item in data]
노드
- detail wrangle
- i@handles = npoints(0);
- Point Wrangle
- f@pscale = 1;
- @prot = 0;
- python
# 커브 인풋에서 Python 노드 추가
#  - Edit Parameter Interface - json_in String 넣기
# 추가한 json_in텍스트에 `chs("../p_json")` 넣기
#  - 그러면 hou.evalParm("./json_in") 로 불러오기 가능
#  - 아니면 곧 바로 hou.evalParm("../p_json")

import json

node = hou.pwd()
geo = node.geometry()

json_str = hou.evalParm("./json_in")
json_list = []
if json_str:
    json_list = json.loads(json_str)

for point in geo.points():
    pt_num = point.number()
    try:
        pt_dict = json_list[pt_num]
    except:
        break

    pscale = pt_dict["scale"]
    pscale = (pscale + 1000) / 1000
    prot = pt_dict["banking"] / 1000

    point.setAttribValue("pscale", float(pscale))
    point.setAttribValue("prot", float(prot))
- Poly Frame
- Tangent : N
- point wrangle
vector up = set(0,1,0);
float angle = f@prot;
matrix rot = ident();
vector axis = @N;
rotate(rot, angle , normalize(axis));
vector rotateP = up * rot;
@up = rotateP;
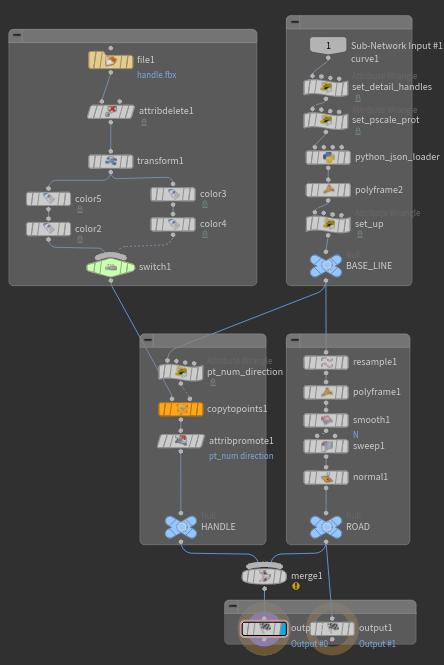
여기까지가 BASE_LINE
- point Wrangle
i@pt_num = @ptnum; v@direction = @N; - Copy To Point
- Attribute Promote
- pt_num, direction:point => primitive
:TODO Jeroen Denayer는 여기서 한발 더 나갔다
- scale
- scale_left
- scale_right
- bank


activeHandle
activeHandleParms_hide
  curve_pos
  handle_type
  basic/
    basic__rotation
    basic_road_width
    basic_road_width_hide
  delete/
    delete__length
  rail/
    rail__length


def getAllHandleTypeParms():
    main_floder = ptg.find("f_activeHandleParms")
    pts = main_floder.parmTemplates()

    parms = []
    for pt in pts:
    if pt.type() != hou.parmTemplateType.Folder:
        parms.append(pt.name())
    else:
        pt_folder = pt
        for pt in pt_folder.parmTemplates():
            if "_hide" not in pt.name():
                parms.append(pt.name())

    return parms

parms = getAllHandleTypeParms()
node.parm("allHandParms").set(json.dumps(parms))

###

def updateActiveHandleParm(kwargs):
    node = kwargs["node"]
    phm = node.hdaModule()
    jsp = node.parm("allHandlesJson")
    jsl = json.loads(jsp.eval())
    index = kwargs["script_value"]
    handle_dict = jsl[index]

###
for parm_name in handle_dict:
    value = handle_dict[parm_name]
    node.parm(parm_name).set(value)
    visible_parms.append(parm_name)

###

def updateActiveHandleParm(kwargs, re_draw_ui = False):
    # Update the json when an active handle parameter changes value.

    node, parm_name = kwargs['node'], kwargs['parm_name']
    phm = node.hdaModule()
    jsp, jsl, ahps, ah = phm.getParmsAndValues(node)

    value = node.parm(parm_name).eval()
    jsl[ah][name] = value
    jsp.set(json.dumps(jsl))

###
레고 블록 쌓기
상태
# ref - [Python States | Paul Ambrosiussen | Games Workshop](https://www.youtube.com/watch?v=H2_38R-V9Gw)
# - blocks      Multiparam Block(list)
#   - pos_#     float3
#   - rot_#     int
#   - hue_#     float
#   - variant_# int

# self._gi = su.GeometryIntersector(hou.Geometry(), scene_viewer=self.scene_viewer)
# self._gi.geometry = self._collision_node.geometry().freeze()
# ui_event = kwargs["ui_event"]
# origin, direction = ui_event.ray()
# self._gi.intersect(origin, direction)

import hou
import viewerstate.utils as su

class State(object):
    def __init__(self, state_name, scene_viewer):
        self.state_name = state_name
        self.scene_viewer = scene_viewer

        self._node = None           # onEnter에서 할당. hda노드
        self._collision_node = None # onEnter에서 할당. BLOCK_COLLISION는 요철(Stud) 부분이 없는 NULL노드
        self._active_block_type = 0 # 0은 4x2블럭, 1은 2x2블럭
        self._active_hue = 0
        self._active_rot = 0
        self._gi = su.GeometryIntersector(hou.Geometry(), scene_viewer=self.scene_viewer)

    def onEnter(self,kwargs):
        self._node = kwargs["node"]
        self._collision_node = self._node.node("BLOCK_COLLISION") # BLOCK_COLLISION는 요철(Stud) 부분이 없는 NULL노드
        self.UpdateCollisionGeo()

        if self.GetMultiParmEntries() == 0:
            self.AddMultiParmEntry()

    ######################
    def GetMultiParmEntries(self) -> int:
        return self._node.parm("blocks").evalAsInt()

    def AddMultiParmEntry(self):
        next_multiparm_entry = self.GetMultiParmEntries() + 1
        self._node.parm("blocks").set(next_multiparm_entry)
        self._node.parm(f"variant_{next_multiparm_entry}").set(self._active_block_type)
        self._node.parm(f"hue_{next_multiparm_entry}").set(self._active_hue)
        self._node.parm(f"rot_{next_multiparm_entry}").set(self._active_rot)

    def UpdateCollisionGeo(self):
        self._gi.geometry = self._collision_node.geometry().freeze()
    ######################

    def onMouseEvent(self, kwargs):
        ui_event = kwargs["ui_event"]
        origin, direction = ui_event.ray()
        self._gi.intersect(origin, direction)
        if self._gi.prim_num == -1:
            return False

        # 클릭한 순간 추가
        if ui_event.reason() == hou.uiEventReason.Picked:
            if ui_event.device().isLeftButton():
                self.AddMultiParmEntry()
                self.UpdateCollisionGeo()

        # 마우스 건드리면 항상 미리보기 위치 변경
        multiparm_entry = self.GetMultiParmEntries()
        intersected_position = hou.Vector3(round(self._gi.position.x()), round(self._gi.position.y()), round(self._gi.position.z()))
        self._node.parmTuple(f"pos_{multiparm_entry}").set(intersected_position)

        # Must return True to consume the event
        return True

    def onMouseWheelEvent(self, kwargs):
        # 휠 돌리면 Shift  누르면 HUE 변경
        # 휠 돌리면 Shift안누르면 90도 회전

        ui_event = kwargs["ui_event"]
        state_parms = kwargs["state_parms"]

        device = ui_event.device()
        scroll = device.mouseWheel()
        multiparm_entry = self.GetMultiParmEntries()
        if device.isShiftKey():
            new_value = self._node.parm(f"hue_{multiparm_entry}").evalAsFloat() + scroll / 100
            self._node.parm(f"hue_{multiparm_entry}").set(new_value)
            self._active_hue = new_value
        else:
            new_value = self._node.parm(f"rot_{multiparm_entry}").evalAsInt() + int(scroll * 90)
            self._node.parm(f"rot_{multiparm_entry}").set(new_value)
            self._active_rot = new_value
        # Must return True to consume the event
        return False

    def onMenuAction(self, kwargs):
        # 아레 context menu에서 넘어옴
        menu_item = kwargs["menu_item"]

        if menu_item == 'blocktype':
            active_block_type = int(kwargs["blocktype"])
            multiparm_entry = self.GetMultiParmEntries()
            self._node.parm(f"variant_{multiparm_entry}").set(active_block_type)
            self._active_block_type = active_block_type


def createViewerStateTemplate():
    state_typename = kwargs["type"].definition().sections()["DefaultState"].contents()
    state_label = "9 Course - Block Placer"
    state_cat = hou.sopNodeTypeCategory()

    template = hou.ViewerStateTemplate(state_typename, state_label, state_cat)
    template.bindFactory(State)
    template.bindIcon(kwargs["type"].icon())

    # 우클릭 context menu 정의
    # https://www.sidefx.com/docs/houdini/hom/hou/ViewerStateMenu.html
    context_menu = hou.ViewerStateMenu('menu', 'Example')
    context_menu.addRadioStrip("blocktype", "Block Type", "0")
    context_menu.addRadioStripItem("blocktype", "0", "8 Pin")
    context_menu.addRadioStripItem("blocktype", "1", "4 Pin")
    template.bindMenu(context_menu)
    return template
- Point Generate
- blocks 수 만큼
- Point Wrangle
string iteration = itoa(@ptnum + 1); vector pos = chv("../pos_" + iteration); float rot = radians(chi("../rot_" + iteration)); float hue = chf("../hue_" + iteration); int variant = chi("../variant_" + iteration); v@P = pos; p@rot = eulertoquaternion(set(0, rot, 0), XFORM_XYZ); v@Cd = hsvtorgb(hue, 1, 1); i@variant = variant; - Copy To Point
- Piece Attribute: variant
- Grid랑 머지하고 아웃풋
BLOCK_COLLISION은
- Blast
- Group: knobs 를 날려주고
- Attr Delete / Group Delete로 깔끔하게 해주자
- 그 다음 Null노드로 이름 BLOCK_COLLISION
Qt
- https://www.sidefx.com/docs/houdini/hom/cb/qt.html
- PySide2가 후디니에 내장되어있다. - PySide6로 업글예정
- https://www.sidefx.com/docs/houdini/ref/panes/pythonpanel.html
- https://doc.qt.io/qtforpython-6/
- 공학자를 위한 PySide2
Houdini pyPills (python) https://www.youtube.com/playlist?list=PLNz2AYjLX37iAzJtftFbXaiOlw-im5_Nr
import importlib importlib.reload(hello_module_name)
- 프리셋
- scripts > pythoon module에 def preset(kwargs): 함수를 넣어두고
- Ordered Menu에서 Callback Script에 hou.phm().preset(kwargs) 호출
HScript expressions
| $N | 'npoints(0)-1 |
$HIP $JOB $HIPNAME $HH
$F $SF $FF $FPS $T
Expression
$BBX = relbbox(@P).x
$BBY = relbbox(@P).y
$BBZ = relbbox(@P).z
| Expression Local Variables | |
|---|---|
| $PT | 포인트 번호 |
| $PR | 프리미티브 번호 |
| $CY | 현재 사본 번호 |
| $TX , $TY , $TZ | 트랜스폼 |
| $TX2 , $TY2 , $TZ2 | 두번째 입력에서 오는 포인트 위치 |
| $NX , $NY , $NZ | 노말 |
| $CR , $CG , $CB , $CA | 칼라 |
| $VX , $VY , $VZ | 벨로시티 |
| $BBX , $BBY , $BBZ | 바운딩 박스 내 점 위치(0 ~ 1) |
| $CEX , $CEY , $CEZ | 기하학의 중심 |
| $AGE | 파티클 수명(초) |
| $LIFE | 파티클 수명(0 ~ 1) |
| $XMIN , $XMAX , $YMIN , $YMAX,$ZMIN,$ZMAX | 경계 범위 |
| $SIZEX, $SIZEY, $SIZEZ | 경계 크기 |
-
box 바닦붙이기
- box의 translate.y = $SIZEY/2
- 혹은 center.y = ch("sizey")/2
-
https://www.sidefx.com/docs/houdini/ref/expression_cookbook.html
-
detail
-
opinputpath
-
https://www.sidefx.com/docs/houdini/expressions/opinputpath.html
padzero
OpenCL
- OpenCL CPU/GPU 변경
- Edit > Preferences > Miscellaneous
- OpenGL Device
- Type : CPU/GPU
- OpenGL Device
- Edit > Preferences > Miscellaneous
https://www.sidefx.com/docs/houdini/vex/ocl.html
| VEX | CPU |
| OpenCL | CPU / GPU |
OpenCL 자체는 C99를 따름
OpenCL에는 foreach() 없음.
- **OpenCL (Open Computing Language)**은 Khronos Group이 만든 이기종 병렬 컴퓨팅 표준입니다.
- NVIDIA OpenCL은 NVIDIA가 자사의 GPU용으로 만든 OpenCL 구현체입니다.
벡터 로드/저장시 vload/vstore 를 쓰는데 후디니에서는 #bind와 @KERNEL을 활용하여 보다 직관적으로 코딩 가능
- bind
- &: write
- ?: opt
- !: noread
#bind point &P float3

@KERNEL
{
    float3 pos = @P;
    pos += 1;
    @P.set(pos);
}
#bind layer src? val=0
#bind layer !&dst

// The Ultimate Copernicus Guide | Every COP Node Explained - OPENCL
// - https://www.youtube.com/watch?v=ZPL215vfNwg&t=13208s

// ?붙었으니 optional
// !&붙었으니 write / noread

@KERNEL
{
  @dst.set(@src);
}
float2 pos; float value = @src.bufferSample(pos);
| index x/y/z | @ix, @iy, @iz, @ixy |
| resolution x/y | @xres, @yres, @res |
@WRITEBACK
{
  @src.set(@dst);
}
GLSL
커스텀 GLSL
-
File > New Assets...
- Definition : VOPs
- Network Type : GLSL Shader
- Code 탭에서 셰이더 작성
-
Material Network
- 생성된 노드 추가
-
Sphere - UV Unwrap - Material
- Material: 에 Material Network에 추가된 것 추가
SHOP ( Deprecated )
- SHOP Network
- Material Shader Builder
- Inline Code
- Material Shader Builder
.vert: vertex shader .frag: fragment shader .geom: geometry shader .tcs: tessellation control shader (GL4.0+) .tes: tessellation evaluation shader (GL4.0+)
VAT
| VAT | Vertex Animation Texture |
| ROP | Render OPerator(for a Houdini ) |
C:/Program Files/Side Effects Software/sidefx_packages/SideFXLabs19.5/otls/SideFX_Labs.hda
| unity .meta | guid |
|---|---|
| VAT_RigidBodyDynamics.shadergraph.meta | 085ef3ec3a5a70d4790c0957d30c9f63 |
| VAT_ParticleSprites.shadergraph.meta | 8bf13a6837d559049924774e12033384 |
| VAT_DynamicRemeshing.shadergraph.meta | 19b419010e1004644affea18d0fc8dff |
| VAT_SoftBodyDeformation.shadergraph.meta | 987a09a96b5f17d46a88a7c429d130d2 |
// SideFX_Labs.hda

parm {
    name    "mat_unity_soft"
    label   "Unity Soft Material"
    type    string
    invisible
    default {}
}
parm {
    name    "mat_unity_rigid"
    label   "Unity Rigid Material"
    type    string
    invisible
    default { }
}
parm {
    name    "mat_unity_fluid"
    label   "Unity Fluid Material"
    type    string
    invisible
    default { }
}
parm {
    name    "mat_unity_sprite"
    label   "Unity Sprite Material"
    type    string
    invisible
    default { }
}
// https://github.com/sideeffects/SideFXLabs/blob/Development/unity/shaders/URP_VAT3/package.json

"com.sidefx.vat": "https://github.com/sideeffects/SideFXLabs.git?path=unity/shaders/URP_VAT3#Development"
| 그대로 | 변함 | ex | ||
|---|---|---|---|---|
| Soft | Constant Topology | 정점 갯수 | 위치 | 캐릭터 애니메이션 |
| Rigid | Rigid Body Topology | 메쉬 형태 | 메쉬 위치 | 파괴 |
| Fluid | Changing Topology | 정점 위치, 정점 갯수 | 유체 | |
| Sprite | Camera Facing Cards | 파티클 |
| [Project]/meshes/[Component]_mesh.fbx | mesh |
| [Project]/textures/[Component]_pos.exr | position |
| [Project]/textures/[Component]_norm.exr | normal |
| [Project]/textures/[Component]_rot.exr | rotation |
| [Project]/textures/[Component]_col.exr | color |
| [Project]/materials/[Component]_data.json |
| Mesh Settings | Turn every toggle off. |
|---|---|
| Preserve Hierarchy | On |
| Sort Hierarchy By Name | On |
| Mesh Compression | Off |
| Optimize Mesh | Nothing |
| Index Format | Auto |
| Normals | Import |
| Normals Mode | Area And Angle Weighted |
| Smoothness Source | Prefer Smoothing Groups (or whatever you prefer) |
| Smoothing Angle | 60 (or whatever you prefer) |
| Tangents | Import |
| Texture Settings | Turn every toggle off. |
|---|---|
| Texture Type | Default. |
| Texture Shape | 2D. |
| Alpha Source | Input Texture Alpha. |
| Non-Power of 2 | None. |
| Wrap Mode | Repeat. |
| Filter Mode | Point (no filter). |
| Override | For Windows, Mac, Linux: On. |
|---|---|
| Max Size | 8192 |
| Resize Algorithm | Mitchell. |
| Format | RGBA Half (16 bit per channel; HDR or even Non-HDR) |
| RGBA 32 bit (8 bit per channel; Non-HDR). |
Rigidbody
Geo
    Sphere
    RBD Material Fracture
    UV Unwrap
    Assemble
    RBD Bullet Solver
    - Transfer Attributes: orient pivot P
    - Transfer to Geometry: checked ???
    - Transfer to Proxy Geometry: unchecked ???

Out
Mode/Target Engine: Rigid-Body Dynamics(Rigid) / Unity
Settings
    Edge Case Handling
        Input Geometry Is Cached to Integer Frames: checked
        Texture Format: HDR(EXR/TIFF as RGBA 16/32 in Engine)
REF
- https://qiita.com/yasuhiro0122/items/1222b61549891af6c2f4
- https://medium.com/tech-at-wildlife-studios/texture-animation-techniques-1daecb316657
- https://www.sidefx.com/tutorials/vertex-animation-textures-in-unity/
랜드스케이프
-
HoudiniXUE4 활용하여 랜드스케이프에 어셋 배치하기
-
에픽 라이브 | 언리얼 엔진 이펙트에 후디니 활용하기
https://www.sidefx.com/community-main-menu/complete-a-z-terrain-handbook/
Unity
-
sidefx
-
유니티 엔진에서 후디니 엔진과 통신하는 것이므로 에디트모드일때만 동작한다.
| attr | |
|---|---|
| unity_instance | point찍고 attr에 프리팝 경로 입력하면 알아서 생성해줌 |
| unity_material |
collision_geo Adds a non-convex, non-rendered mesh collider rendered_collision_geo Adds a non-convex, rendered mesh collider
lod
lod_screensize
-
https://www.sidefx.com/docs/houdini/unity/terrain/scattering.html
-
https://docs.unity3d.com/ScriptReference/TerrainData.html
- The TerrainData class stores heightmaps, detail mesh positions, tree instances, and terrain texture alpha maps.
- The Terrain component links to the terrain data and renders it.
- treeInstances
- treePrototypes
-
https://docs.unity3d.com/ScriptReference/TreeInstance.html
- Contains information about a tree placed in the Terrain game object.
- This struct can be accessed from the TerrainData Object.
- Description
-
color
-
heightScale
-
lightmapColor
-
position
-
prototypeIndex
-
rotation
-
widthScale
-
https://docs.unity3d.com/ScriptReference/TreePrototype.html
- Simple class that contains a pointer to a tree prototype.
- This class is used by the TerrainData gameObject.
-
bendFactor
-
navMeshLod
-
prefab
s@unity_hf_tree_prototype0 s@unity_hf_tree_prototype1 s@unity_hf_tree_prototype2
s@unity_hf_layer_type = "detail";
s@unity_hf_detail_prototype_texture = "Assets/Race_Track_Tools/Art/Textures/Grass/grass_clump_001.png"; f@unity_hf_detail_prototype_maxheight = 3; f@unity_hf_detail_prototype_maxwidth = 3; f@unity_hf_detail_prototype_minheight = 1; f@unity_hf_detail_prototype_minwidth = 1;
f@unity_hf_detail_prototype_bendfactor = 50; i@unity_hf_detail_prototype_rendermode = 0;
i@unity_hf_detail_distance = 200; f@unity_hf_detail_density = 1; i@unity_hf_detail_resolution_patch = 128;
체크리스트
- 인스턴스
- unity_instance
- 머티리얼
- unity_material
- 컬리전
- collision_geo
- rendered_collision_geo
- LOD
- lod_0
- lod_screensize
- 식생같은 경우
- unity_hf_tree_prototype1
Unreal
- UNREAL STARTER KIT
- 도시 샘플 퀵스타트 - Houdini를 사용해 도시와 고속도로 만들기
- 도시, 고속도로
- Project Titan
- 드래그 화물배치
- 파이프
- Houdini Engine to Unreal Engine Workflow
- 팬스
Joy Of Vex
- https://www.tokeru.com/cgwiki/JoyOfVex.html
- Houdini Hangout - The Joy of VEX
- TWA 후디니의 정석 - JOY_OF_VEX(한국어.ver)
- https://github.com/kiryha/Houdini/wiki/vex-for-artists
List
- JoyOfVex01 basic assignment, component assignment, arithmetic manipulation
- JoyOfVex02 length and distance functions, animate with @Time
- JoyOfVex03 clamp and fit, waves
- JoyOfVex04 chramp, using on attrib components, on time, on reranging outputs
- JoyOfVex05 modulo, more arithmetic tricks (quantising), but show that often a chramp is easier (eg stepped chramp);
- JoyOfVex06 point wrangle vs prim wrangle vs detail wrangle, user defined attributes
- JoyOfVex07 using the other inputs on wrangles, do things to geometry based on other geometry
- JoyOfVex08 noise, various types, how it can be scaled, vector vs scalar noise, why you might use vops here instead
- JoyOfVex09 dot and cross product, fake lighting combing normals to a surface, vector maths primer
- JoyOfVex10 relpointbbox
- JoyOfVex11 if statements
- JoyOfVex12 nearpoints, arrays
- JoyOfVex13 for loops (ties nicely into arrays)
- JoyOfVex14 creating geometry, deleting geometry, debugging vex
- JoyOfVex15 copy sop, simple instance attributes (pscale)
- JoyOfVex16 copy sop, midweight instance attributes (scale, N)
- JoyOfVex17 copy sop, orient, quaternions
- JoyOfVex18 intrinsics
- JoyOfVex19 primuv, xyzdist
- JoyOfVex20 pointclouds, further learning
01
- Attribute Wrangle
- Runs a VEX snippet to modify attribute values.
- Wrangle : 다루다
| @Cd | 색상 |
| @N | 노말 |
| @ptnum | 해당 포인트 번호 |
| @numpt | 포인트 총 갯수 |
| ch('scale') | 채널 |
| sin | 사인 |
@Cd = @N;
@Cd = @P;
@Cd = @ptnum/@numpt;
@Cd = float(@ptnum) / ch('scale');
@Cd = sin(@ptnum);
https://www.sidefx.com/docs/houdini/hom/hou/Geometry.html https://www.sidefx.com/docs/houdini/hom/hou/Point.html https://docs.python.org/3.13/library/math.html https://www.sidefx.com/docs/houdini/hom/hou/index.html#parmtemplates_group
node = hou.pwd()
geo = node.geometry()

if not geo.findPointAttrib("Cd"):
    geo.addAttrib(hou.attribType.Point, "Cd", (1.0, 1.0, 1.0))

if not geo.findPointAttrib("N"):
    geo.addAttrib(hou.attribType.Point, "N", (0.0, 1.0, 0.0))

points = geo.points()

numpt = len(geo.points())                # @numpt
numpt = geo.intrinsicValue("pointcount") # @numpt

for point in points:
    P     = point.position()       # @P
    ptnum = point.number()         # @ptnum
    N     = point.attribValue("N") # @N

    point.setAttribValue("Cd", P)
import math

radian = 1.0
sin_value = math.sin(radian)
def AddParameters():
    parameters = [
        # hou.FloatParmTemplate(name, label, num_components, ...)
        hou.FloatParmTemplate("scale", "scale", 1, default_value=(1.0,), min=0.0, max=10.0),
    ]

    node = hou.pwd()
    parm_template_group = node.parmTemplateGroup()
    for param in parameters:
        param_name = param.name()
        if not node.parm(param_name):
            parm_template_group.append(param)
    node.setParmTemplateGroup(parm_template_group)
02
length(@P) == distance(@P, {0, 0, 0})
| chf | hou.FloatParmTemplate("scale", "scale", 1, default_value=(1.0, ), min=0.0, max=10.0) |
| chv | hou.FloatParmTemplate("scale", "scale", 3, default_value=(1.0, 1.0, 1.0), min=0.0, max=10.0) |
fit(v, in_min, in_max, out_min, out_max);
@Time : Float time ($T) |
03
float d = length(@P);
d *= ch('v_scale');
d += @Time;
@P.y = sin(d);
clamp(v, min, max);
04
chramp
05
trunc
06
::pass
07
https://www.sidefx.com/docs/houdini/vex/functions/minpos.html minpos VEX function Given a position in world space, returns the position of the closest point on a given geometry.
https://www.sidefx.com/docs/houdini/vex/functions/nearpoint.html nearpoint VEX function Finds the closest point in a geometry.
@P = point(1, 'P', @ptnum); @P = @opinput1_P;
08
noise curlnoise pnoise
09
dot cross
10
normalize relpointbbox
11
if
12
| Ctrl + / | 라인 주석 |
13
foreach( element; array)
{
    // do things to element
}
for ( starting value; test; value increment)
{

}
14
addpoint // removepoint addprim // removeprim addvertex // removevertex
15
::pass
16
::pass
17
quaternion
float angle = ch('angle');
vector axis = chv('axis');

@orient = quaternion(angle, axis);
@N = {0,1,0};
float s = sin(@Time);
float c = cos(@Time);
@up = set(s,0,c);

@orient = quaternion(maketransform(@N, @up));
matrix3 m = ident();
@orient = quaternion(m);


vector rot = radians(chv('euler'));
@orient = eulertoquaternion( rot, 0);


vector4 a = {0,0,0,1};
vector4 b = quaternion({0,1,0}*$PI/2);
@orient = slerp(a, b, ch('blend') );


@orient = qmultiply(@orient, extrarot);
matrix m = qconvert(@orient);
radians qconvert
https://www.sidefx.com/docs/houdini/vex/attribtypeinfo_suite.html Sets the meaning of an attribute in geometry. int setattribtypeinfo(int geohandle, string attribclass, string name, string typeinfo)
18
matrix3 m = ident();
setprimintrinsic(0, 'transform', 0, m);
matrix3 m = matrix3( myfancy4x4matrix);
matrix pft = primintrinsic(0,'packedfulltransform',@ptnum);
matrix3 rotandscale = matrix3(pft);
3@b = rotandscale;
19
vector uv = chv('uv');

@P = primuv(1,'P',0,uv);
@N = primuv(1,'N',0,uv);
i@primid;
v@uv;
@dist;

@dist = xyzdist(1,@P, @primid, @uv);

@P = primuv(1,'P',@primid, @uv);
20
int pts[] = nearpoints(1,@P,ch('d'),25);
int pt;
vector pos;
foreach (pt; pts)
{
  pos = point(1,'P',pt);
  addpoint(0,pos);
}


int pts[] = pcfind(1,'P',@P,ch('d'),25);
int pt;
vector pos;
foreach (pt; pts)
{
  pos = point(1,'P',pt);
  addpoint(0,pos);
}
pcopen pcfilter
int pc = pcopen(0,'P',@P, ch('dist'), chi('maxpoints'));
@Cd = pcfilter(pc, 'Cd');
- PROJECT TITAN
- 도시 배경
- PROJECT PEGASUS
- 산 지형
- PROJECT GROT
- 용암 지형
- PROJECT VITRUVIUS
- ??
PROJECT TITAN STACKING TOOL
-
https://www.sidefx.com/tutorials/project-titan-stacking-tool/
-
시뮬해서 떨어지게 하는 부분이 잼씀.
-
어럽네 중간에 디프리케이트된 노드랑 조금 개념에 안맞는게 있음.
-
pivot문제랑 py_max구하는 부분
Groupd_props => gr_base_layer
1 | Unreal Engine Setup
-
속성
- AssetPath
- Width
- Height
- Length
- Rotation
- Scale_MIN
- Scale_MAX
-
Create > Place Actors > Panel
- Geometry > Box
- Activate Brush Editing Editing Mode (Shift + 6)
- Geometry > Box
-
Houdini
- Windows > Houdini Engine Session Sync
2 | Setting up the HDA
-
Object Merge로 언리얼 DataTable을 가져오면 point에 attribute를 가지게 됨.
-
https://www.sidefx.com/ja/forum/topic/86532/?page=1#post-374007
- Labs Building From Patterns 편집
정보를 불러와서 더미에 셋팅
- CSV Import 노드 (csv를 로드)
- Fill Attribute Info from Header로 간편하게 로드하자
- 필요시 Attribute Rename을 사용하여 이름을 바꾸자
- Wrangle (Point)
vector s = set( @Width, @Height, @Length ); @scale = s; @P = {0, 0, 0}; - Color
- Color Type: Random from Attribute
- Attribute : AssetPath
- Copy to Point - 박스랑
- Pack and Instance
- Connectivity - Primitive 로 class 어트리뷰트로 각 박스별 그룹지어주고
- Attribute Promote - 최대값을 저장해둔다
- Original Name : class
- Original Class : Primitive
- New Class : Detail
- Promotion Method : Maximum
- Change New Name : max
- Delete Original : 언체크
- Unpack
- Transfer Attribute : *
primitive:
    +class

detail:
    +max
더미 위치 조정
class(primitive)를 point(variant)로 변환
- Foreach Primitive - Piece Attribute : class
- Match Size
- Justify Y : Min
- Bound
- Attribute Transfer
- Detail
- Match Size
- Attribute Promote
- Original Name : class (primitive)
- New Name : variant (point)
- Null: INPUT_SCATTER
point:
    +variant

primitive:
    -class =>  point:variant

detail:
    max
3 | Packing Assets
배치 구역 밑바닥
- Object Merge로 영역을 가져고
- Group
- Keep by Normal
- Direction: 0, -1, 0
- Spread Angle : 20
- Keep by Normal
- Blast
- Reverse
- Null : OUT_BOTTOM_LAYER
배치 구역 설정
OUT_BOTTOM_LAYER에 점을 뿌리고 variant를 랜덤화시킨다.
- Scatter and Algin 으로 점을 뿌리고
- https://www.sidefx.com/docs/houdini/nodes/sop/scatteralign.html
- Point Count Method : By Density
- Density Scale에 따라 오브젝트 크기도 달라짐
- Wrangle (Point)
- @id = @ptnum;
- Attribute Randomize
- Attribute Name : variant
- Dimensions: 1
- Distribution : Uniform(Discrete)
- Max Value : detail("-1", "max", 0)
- Spare Input : ../INPUT_SCATTER
- Attribute Cast
- Attributes : variant
- Precision: 16-bit integer
- Null: INPUT_SPREAD_POINTS
+point:id==@ptnum
+point:orient
+point:variant        // random from ../INPUT_SCATTER's detail:max
iscale셋팅
- Copy to Point - INPUT_SPREAD_POINTS의 variant 기반으로 INPUT_SCATTER를 변형하며 뿌리기
- Piace Attribute : variant
- Pack and Instance
- Attribute Transfer
- Detail도 활성화
- Attribute Randomize
- Attribute Name : iscale
- Attribute Class : Primitive
- Distribution : Uniform(Discrete)
- Dimensions : 1
- Min Value:
- Max Value:
- Step Size:
- Unpack
- Transfer Attribute : *
- Null : RANDOMIZE_ISCALE
point:
    variant
    id

primitive:
    +iscale

detail:max
uv layout을 사용한 배치
- UV Layout
- UV Attribute : P / ZX Projection
- Island Scale Attribute: iscale
- Axis Alignment : None
- Packing
- Scale: Fixed
- Spread Islands in Cavities of Other Islands
- Targets
- Pack Into : Islands From Second Input
- 두번째 입력으로 Object Merge: ../OUT_BOTTOM_LAYER > Remesh TODO
- UV Attribute : P / ZX Projection
- Pack Into : Islands From Second Input
- Nonpacked Polygons : nonpacked
- Blast : nonpacked
- Null : OUT_BOTTOM_LAYER_PACKED
point:
    variant
    id

primitive:
    iscale
    +group:nonpack

detail:
    max
    +coverage
    +numnopacked
4 | Stacking Assets
50분 정도 내용이라 따라가기 힘듬
-
Partion 노드는 deprecated.
- Use the Groups from Name node instead.
-
Attribute Promote
- id(point) => id(Primitive)
-
Pack
- Path Attribute: op:\`opfullpath('.')\` - Name Attribute: id - Create Packed Fragments: 체크 해제 - Transfer Attributes: * -
Group : gr_base_layer
point:
    variant
    -id =>  primitive:id

primitive:
    +id
    +path  ex) op:/obj/geo1/pack1/0
    iscale
    -group:nonpack

detail:
    -max
    -coverage
    -numnopacked
피드백을 이용해서 한단씩 쌓기
- For-Loop with Feedback
- Null: PROCESS
- Null: FEEDBACK 은 나중에 머지용으로 빼두고
PROCESS 에서 상단면을 구하고
- Unpack
- Group (gr_top_mesh)
- Keep by Normal
- Direction: 0, 1, 0
- Spread Angle : 20
- Keep by Normal
- Blast (gr_top_mesh)
- Group Promotion (gr_top_mesh)
- Primitive to Point
상단면에서 가장 높은 면만을 고른 뒤
- Wrangle (Primitive)
- f@py = @P.y;
- Attribute Promote
- py(primitive) => py_max(detail)
- Promotion Method : Maximum
- blast
@py=`detail(0, "py_max", 0)`
무리지어 묶는다
- Pack (pack_for_cluster)
- Cluster Points
- https://www.sidefx.com/docs/houdini/nodes/sop/clusterpoints.html
- Point attribute가 cluster가 생기고 해당 클러스터 번호가 들어간다.
- Clusters: ch("spare_input0") * 1.5
- Clust : (모여있는 )무리
- Clusters 수치를 조절하여 뭉처있는 것들을 조절
- Spare Input 0 : `npoints(-2)`
- The first spare input is -1, the second is -2, and so on
- Spare Input 1 : ../pack_for_cluster
- https://www.sidefx.com/docs/houdini/nodes/sop/clusterpoints.html
- Attribute Promote
- cluster:point > primitive
- Unpack
- Transfer Attribute : *
무리를 감싸는 영역을 만들고
- foreach primitive로 Cluster 구역별로 묶기
- Piece Attribute : cluster
- Shrinkwrap (2D) 로 엮여있는것들을 묶어주고
- Transform 조금작게 해주자
- Uniform Scale: 0.8
- Pivot Translate: $CEX/$CEY/$CEZ
- Remesh
- Null: HIGHER_AREA
해당 영역에 다시 적층하자
RANDOMIZE_ISCALE를 object merge로 가져오고, 다시 attribute randomize를 시켜주자. 그리고
-
UV Layout
- UV Attribute : P / ZX Projection
- Island Scale Attribute: iscale
- Axis Alignment : None
- Packing
- Scale: Fixed
- Spread Islands in Cavities of Other Islands
- Targets
- Pack Into : Islands From Second Input
- 두번째 입력으로 Object Merge: ../OUT_BOTTOM_LAYER > Remesh TODO
- UV Attribute : P / ZX Projection
- Pack Into : Islands From Second Input
- Nonpacked Polygons : nonpacked
-
Blast : nonpacked
-
Attribute Promote
- id:point > primitive
-
Pack
-
그다음 FEEDBACK과 머지
-
Attribute Promote
- iscale:primitive => pscale:point
-
Copy To Point - OUT_HIGH과
- Piace Attribute : variant
- Pack and Instance
- 추가 Points by Copying : pscale orient
5 | Simulation
-
Group (gr_active)
- Point
- BaseGroup: gr_base_layer
-
Split: gr_activate
- unpack > Null (ACTIVE)
- unpack > Null (NON_ACTIVE)
-
NON_ACTIVE에서
-
Wrangle (point)
- f@active = 1;
- v@v = chv("direction") * chf("boost") * rand(@ptnum);
-
RBD Bullet Solver
- Output: Transfer Attribute : orient
- OUT_OBJECT_PLACEMENT랑 grid랑 MatchSize하고 ACTIVE랑 머지한걸 input4에 넣음
-
Timeshift
- Frame: 50
-
Group : gr_inside_bound
- Keep in Bouding Region
- Bouding Object(point or vertices only)로 감싸는 영역만 하고
- Keep in Bouding Region
-
Blast : gr_inside_bound
- Delete Non Selected
-
그리고 ACTIVE랑 머지
이제 포인트만 남기도록
- Clean
- Remove Attribs:
* ^N ^up ^orient ^scale ^pscale ^unreal_instance ^unity_instance
- Remove Attribs:
- Connectivity
- Primitive
- Foreach Primitive - Piece Attribute: class
- gr_piece
- Wrangle (detail)
- vector min;
- vector max;
- getbbox(min, max);
- vector center = (min + max) / 2;
- vector combo = set(center.x, min.y, center.z);
- addpoint(-1, combo);
- Blast : gr_piece
- Attribute Transfer 전부
그러면 이제 끝
PROJECT TITAN CABLE TOOL
-
라인 활용 Vellum Hair를 이용한 시뮬레이션
-
Connect Adjacent Pieces 인접 조각 연결로 서브 케이블 만듬
2 | Create the Main Cables
- Circle
- Mountain
- Noise Along Vector 해제 및 XY만 활성화
- Connect Adjacent Pieces - 이렇게 하면 primitive갯수가 늘어나버림
- Adjacent Points
- Search Radius: 10
- Convert Line
- Attribute Promote
- restlength:primitive => minimum => point:pscale
- Attribute Transfer
- 앞서 mountain된것에 point:pscale만 넘겨준다
- Sweep
- Line / Resample 한것을 첫번째 인풋으로
- Surface Type: Columns
- Attribute Randomize
- random:primitive
- Attribute Promote
- random:primitive => random:point
- Group by Range (gr_line_pins)
- Point
- Invert Range
- Conectivity/Affect Disconnected Geometry Seperately
- Vellum Hair
- Constraint Type: String
- Pin to Animation
- Pin Points: gr_line_pins
- Vellum Solver
3 | Create the Small Cables
4 | Build the Digital Asset
- 입력을 2개 추가한다
- 1번째 입력은 line을 대체
- 2번째 입력은 컬리전으로 Vellum Hair의 3번째 인자로 들어가게 된다.
5 | Open in Unreal
- Attribute Create
- unreal_material
6 | Use Trimsheet Textures
- Sweep에서 Compute UVs
UV를 수평으로
- Labs Trim Texture Utility
- Initialization Mode: Generate from ID Map 으로 색으로 구분된 ID맵을 입력받아 trim을 생성
없으면 Grid를 활용
- Grid
- Row는 ID갯수 +1만큼
- Top뷰(2번키)로, Select(s키) 포인트(2번키)로 선택후 Translate(t키)를 눌러 y축 조정
- UV Project
- Rotate: 90 / -180 / 0
- Primitive Split 으로 각 부분을 나눠주고
- Trim Texture Utility
- Initialzie누르면 됨.
- Labs Automatic Trim Texture
- UV 크기 비율에 맞추어 알아서 레이아웃시켜줌
PROJECT TITAN PLATFORM TOOL
- 외곽 라인 스케일 조절
- convert line
- primitive split
- attrib promote
- restlength:primitive => point
- primitive properties
- Transform - Do Translation의 스케일 조정
PROJECT TITAN RAILS TOOL
:pass
PROJECT TITAN FENCE TOOL
: pass
PROJECT TITAN BUILDING TOOL
PROJECT TITAN IVY TOOL
ivy: 담쟁이덩굴
shrub 관목 (=bush)
PROJECT TITAN TREE PIVOT PAINTER
PROJECT TITAN VAT CHARACTERS
PROJECT TITAN GPT SIGNAGE
PROJECT TITAN TRAIN TOOL
Learning Paths
- 튜토리얼이 vimeo로 된게 많은데 느릴시 CDN Priority 조정
Learn > Learning Paths > Unity
START HERE
-
- https://www.youtube.com/playlist?list=PLXNFA1EysfYl0noIUdMUSsG-TOpkm0-CQ
- 여러 툴들 소계
- Tree
- 가지 - 나중에 잔가지 부분 살펴볼것
- Curve로 나무 기둥을 잡고
- Resample - Subdivision Curve로 부드럽게 함
- Facet으로 점 정리를 하고
- 기둥 중간에서 렌덤으로 위치를 잡고
- distancefromtarget으로 바닥에서 멀어질 수록 짧게 가지가 자랄 수 있도록 한다
- 가지가 자랄때는 Bend로 위를 향하게 하고 몇번 반복하고 Sweep하면 가지는 완성
- 나뭇잎영역
- 가지 영역을 Bound/Remesh후 Ray하면 가지 영역을 랩핑한것과 같아짐
- Remesh/ Smooth/ Peak하면 나뭇잎영역을 얻을 수 있음
- 나뭇잎은
- Grid 3장을 90도 각도로 겹쳐서 나뭇잎 영역에 뿌림
- 가지 - 나중에 잔가지 부분 살펴볼것
- UNITY Starter Kit | Rock Tool
- 바위 영역
- Voxel Mesh로 바위를 생성할 영역을 둥글게 만들어 주고
- 메인 바위는 Scatter로
- 주변 바위는 edgegroup to curve / scatter / peak으로 펼쳐서 뿌려준다
- 바위 설정은 Point VOP로 그라디언트로 색입히기(아레쪽이 어둡게)
- 바위 영역
- UNITY Starter Kit | Modular Wall Tool
- 나무 타입
- Box를 Poly Bevel로 부드럽게 한 후 9도정도 기울이게
- mountain대신에 point jitter로 살짝 모양 변형
- symmetrize로 앞뒤 같게
- 바위 타입
- lot_subdivision로 영역을 나누고
- attr random - float point:Cd ramp
- attr promote - point:Cd => - primitive:Cd
- Poly Extrude : insert 마이너스
- indivisual elements / output side은 필요없음
- Poly Extrude : distance
- Local Control로 Distance Scale : Cd
- Attr noise - pscale
- Divide
- Poly Bevel - Scale by Attribute : pscale
- 나무 타입
- FOLIAGE
- 모드 Leave/ Plant /Ivy
- Leave
- Line에 Sweep으로 윤곽을 잡고
- p를 bbox의 y의 최대-최소 나누면 중간만 어두워지는데 그 부분을 포인트를 뿌려서 Boolean으로 잘라준다(box를 찌그려뜨려서)
- 담쟁이처럼 물체따라 가는거
- 붙어있을 물체를 remesh하고 peak으로 부풀려주고
- 시작점받아서 붙어있을 물체에서 nearpoint로 해서 가까이 있는 점을 찾고
- End점을 랜덤으로 뿌려주고
- findshortestpath로 가지의 길을 냄
- 잎은 가지길에서 포인터 뿌려서
- 가지몸체는 poly wire로
- UNITY Starter Kit | Edge Damage Tool
- switch-if : npoints(0)==0
- remesh 스므스 살짝 / smooth / normal / mountain / peak / normal 그리고 boolean
- UNITY Starter Kit | Level from PSD Tool
- :pass
- UNITY Starter Kit | Placement Tool
- :pass
- UNITY Starter Kit | Pipe Tool
- 커브에서 Bevel을 적용한 다음 그 꺽인 부분에 이음세를 넣는 방식
- UNITY Starter Kit | Platform Tool
- 테두리
- 영역을 Voxel Mesh로 만듬
- split_prim_by_normal로 +Y Invert Selection으로 위쪽을 날림
- group/edgegroup_to_curve로 위쪽 엣지(라인)을 잡음
- peak으로 조절하고 Attr randomize로 N을 변경시킴(y는 0으로)
- attr noise로 pscale을 변경시켜주고
- transform으로 살짝 띄우고
- 테두리 돌
- platonic을 아래쪽을 잡아 늘리고
- Boolean으로 cube를 이용해서 모서리 깍아줘서 테두리 돌을 만듬
- 영역
- Voxel Mesh에서 위쪽만 Mountain.
- Attribute Noise로 Cd로 돌 영역을 색칠해서 작은 돌을 뿌림
- 테두리
- Unity Starter Kit | Terrain Tool
- :pass
- Unity Starter Kit | Road Tool
- :pass
- UNITY Starter Kit | Level from WFC
- 영역을 isooffset으로 만들고
- wfc_initialize과 Group : Bouding Volume으로 그룹핑하여 겹치는 영역을 Color로 검정색으로 만듬
- wang_tiles_decoder해주고
- blast - @name==0
- Unity Starter Kit | Trim Tool
- :TODO 나중에 볼것 trim
-
GETTING STARTED WITH HOUDINI ENGINE FOR UNITY
- 육각형 지형, HDA 생성, unity_instance
- Attribute Create
- Attribute Randomize
-
HOUDINI ENGINE FOR UNITY | INSTANCING & VARIATION
- Scatter and Align 로 뿌려넣고 unity_instance로 소환
- Attribute Randomize
- Options / Global Seed
- Parameter Description / Type: String / Tags / TagName: heuassetpath 로 엔진파라미터로 프리팹 받을 수 있도록 설정.
-
HOUDINI ENGINE FOR UNITY | SESSION SYNC
- https://www.sidefx.com/docs/houdini/ref/panes/enginesessionsync.html
- Houdini > New Pane Tab Type > Misc > Houdini Engine SessionSync > Start
- Unity > Houdini Engine > Session Sync > Connect to Houdini
- 유니티에서 hda 불러오면, 후디니에서도 보기 가능
- 유니티에서 New Node를 생성하면, 후디니에서도 생성됨. 후디니에서 편집가능.
- 유니티에서 Save Node로 저장하면 .hess(
HoudiniEngineSessionSync) - 유니티에서 Load NodeSync로 불러오기 가능.
- 유니티에서 Save Node로 저장하면 .hess(
-
- 간단한 모델링, 그루핑, 어트리뷰트, HDA, Curve
- Desktop 설정
- 단축키 C
- node
- Poly Extrude
- Poly Bevel
- Poly Split
- Bend
- Edit
- Fuse
- Resample
- Copy To Point
- Orientation Along Curve // Curve에서 각도 유지
- 파라미터 조정을 통해 사슬과 같은 효과를 낼 수 있다.
- Copy To Curve == Orientation Along Curve + Copy To Point
- Draw Curve // 축 기반으로 그리거나, 매쉬에 그릴 수 있음.
- Match Size // 중점 이동
- Trace // Traces curves from an image file or heightfield.
- Group
- Group
- Group by Range // with Tube, Poly Extrude
- Group Combine
- Group Promote
- Attribute
- Attribute Create
- Attribute Noise // Cd, scale, N, pscale
- Attribute Randomize
- Attribute Promote
- 6 | MAKE GAME-READY ASSETS
- 1
- File
- Labs Game Res // Reduce, Auto UV, Bake
- ROP FBX Output
- 2
- Poly Reduce
- Auto UV
- Soften Normals
- Labs Map Baker
- 블록 모서리 깍인 효과
- Attribute Noise - pscale
- Poly Bevel
- Ignore Flat Edges
- Scale By Attribute
- 1
-
- 사슬
- Draw Curve - Resample - CopyToCurve
- Apply Yaw
- Yaw: 90
- Apply Roll or Twist
- Full Twists: 7
- Apply Yaw
- Draw Curve - Resample - CopyToCurve
- 팬스
- 노드
- output, color
- Point Jitter로 변형 (crooked)
- Poly Bevel - Round
- Attribute Noise - scale 로 높이조정
- Attribute Noise - N 로 흩으러짐(회전) 효과
- Distance Along Geometry
- Output Mask로 Ramp값을 할당
- Attribute VOP
- Import Point Attribute - mask
- 변형주고 scale에 할당.
- Labs Color Gradient로 y축 기반 색상 지정.
- Copy To Curve
- Target Type: Next Edge로 이어진 팬스
- Target Up Vector 조절로 뒤집힘 방지.
- HDA
- Parameter
- Match Current Definition
- vex: ch
- 노드
- Type Properties > Node > Guide Geometry
- 가이드라인으로 와이어 프레임으로 보여짐.
- Switch추가로 Toggle하여 사용
- 사슬
Sci Fi Level Design
SCI FI PANEL GENERATOR
- PART 1 | MODELING THE PANEL
- PSD를 읽어 모델에 반영
- GameDev Trace PSD File 노드
- 레이어 및 Brightness Threshold 지정 가능
- Split으로 그룹을 일단 나누고.
- Blaster로 PSDLayerNumber 분리
- @PSDLayerNumber=1 // Delete Non Selected
- GameDev Thicken
- GameDev Axis Align
- 원통의 Bound를 구하고 Blast로 옆면을 때 Fuse로 중앙 점을 찾음
- Attribute Randomize로 index를 설정하고
- Copy - Stamp - Stamp Input 체크 및 Attribute Stamps에 index ?? 스탬프가 뭘까?
- Switch 쪽에서 stamp("../copy1", "index", 0)
- Create Meta Import Node
- iteration, numiterations, value, ivalue
- Attribute Randomize의 Seed에
- detail("../repeat_begin1_metadata1/", "iteration", 0)
- rand(detail("../repeat_begin1_metadata1/", "iteration", 0) + $F)
- Assemble : 매쉬 정리
- Create Packed Geometry
- Blast로 원하는거 몇개 골라서 @P.z > 5
- Unpack
- For-Each Connected Pieces
- Transform
- Pivot Translate : $CEX, $CEY, $CEZ (영상에선 preset 활용했음)
- Scale: 1, 0, 0
- Scatter로 랜덤하게 좀 뿌려주고
- Seed: detail("../repeat_begin1_metadata1/", "iteration", 0)
- Fuse로 붙어있는거 좀 정리해주고
- Create Meta Import Node
- 새로운 갈래
- Transform
- Translate : - $CEX, - $CEY, - $CEZ
- Scale: 0.1, 1, 1
- Pivot Translate : $CEX, $CEY, $CEZ (영상에선 preset 활용했음)
- PolyBevel로 볼트처럼 만들고
- Transform
- Copy To Point
- 볼트 종류는 Switch로 (switch2)
- Attribute Randomize에서
- Max Value: opninputs("../switch2/") - 1 : opninputs 인풋 갯수 반환
- Transform
- PART 2 | ADDING DETAIL
- GameDev Trace PSD File 노드
- Split으로 그룹을 일단 나누고. @Cd.r > 5 - Invert Selection
- 그룹1 - 선으로 면에 이음선 넣기
- GameDev Straight Skeleton 2D (Beta) / Facet / Fuse 로 선을 얻고 / Attribute Create N을 사이즈3. 값 0, 0, 1
- Sweep - Skin Unclosed으로 Line과 엮어서 판을 만듬.
- For-Each Connnected Piece
- Boolean Shatter
- Poly Bevel
- Attribute Delete - Cd
- 그룹2
- For-Each Connnected Piece
- Fuse
- Transform으로 위치를 올려서
- Ray 로 닿는 면과 달라붙도록 만듬.
- Attribute Randomize - N
- For-Each Connnected Piece
- 그룹1 - 선으로 면에 이음선 넣기
- Split으로 그룹을 일단 나누고. @Cd.r > 5 - Invert Selection
- 그냥 표면
- GameDev Voxel Mesh
- GameDev Measure Curvature
- Blast - @Cd > 0.2
- Group - Keep by Normals - 0, 1, 0
- Scatter
- 추가 작업
- GameDev Voxel Mesh - Resolution을 다르게 해서 high, low폴리 제작
- Lattice
- Poly Reduce
- Group - 0, -1, 0의 하단 패널 부분을 선택
- Blast
- GameDev Delete Small Parts
- 파이프
- Group - Include by Edge - Min Edge Angle을 조정하여 각진 부분만 그룹핑
- Poly Bevel
- Subdivide
- 파이프 클립
- Clip으로 파이프 전체가 아닌 단면만을 사용가능.
- 마무리
- GameDev Remove Inside Faces
- GameDev Auto UV - UV Unwrap
- GameDev Soften Normal - Harden UV Seams
- GameDev Trace PSD File 노드
- PART 3 | CREATING THE DIGITAL ASSET
- HDA 설정
SCI FI CRATE GENERATOR
- PART 1 | MODEL THE CRATE
- Box / GameDev Axis Align / Null(IN)
- Boolean - Shatter로 뚜껑을 구분지음 - A-Only Piece
- Grid - 0, bbox("../IN/", D_YSIZE) * 0.8
- IN_Part_01
- group / blast / polybevel / polyfill 로 윗단을 날리고 하단을 부드럽게 하고 윗단을 다시 채운다
- PART 3 | BAKE THE TEXTURE MAPS
- PART 4 | ADD DECALS
SCI FI DOOR GENERATOR
Box - PolyBevel 이랑 Boolean (Shatter) - Poly Expand 2D를 사용해서 문 패턴
그룹을 쉽게할 수 있는 Quick Group이라는 서브네트워크가 있음
SCI FI TERMINAL & FUEL TANKS
Carve랑 Boolean 조합 모양잡기
SCI FI STAIR GENERATOR
Line을 Resample한것과 Line을 Bound한것을 Ray(Minimum Distance)시켜서 라인의 크기 방향이 변해도 꺽이는게 일정하도록 끝부분만 꺽이게 만듬.
- PART 3 | UNWRAP UVS FOR TRIM SHEET
- UV 입힐때는 일단 파츠별로 색 입히고 ID할당한다음 Foreach돌면서 UV Transform활용하여 트림에 맞춰서 위치시킴
SCI FI CORE
- Tube로 삼각형 만들 수 있고
- Copy - Rotate.y : 360 / ch("ncy") 으로 Total Number에 맞게 회전하게 했다.
- Lab Lighting이라는 노드도 있네
SCI FI LEVEL BUILDER
- 커브를 Fuse의 Snap To: Grid 로 그리드로 스냅핑했다. 그런 후 Grid와 Copy To Point. Fuse로 중복 점 제거, Labs Dissolve Flat Edges로 엣지정리.
- Poly Extrude를 하면서 Output Front를 빼면 벽이 처짐
- Measure Curvature로 인코스/아웃코스 구분하여 코너에 배치할 물체 회전
DUNGEON PROPS
2. MODEL THE WOOD CRATES
스타일라이즈 형태의 나무제질
- Attribute Noise로 Cd를 확인하고 그다음 pscale로 변경
- Poly Bevel시 Offsetting에서 Scale By Attribute로 pscale 사용.
- Remesh Grid로 잘게 쪼개주고
- Point VOP
- Vein과 Displace Along Normal로 나이테에 따른 높이조절
- 정사각형같은 건 Cylinder. 판자같은건 Linear로 함
- GUARD TOWER 2 | WOOD WALL PART 9 참조
WFC DUNGEON GENERATOR
- WaveFunctionCollapse
- Wang
while True: # 반복 x = collapse(wave) # 붕괴 if x is False: break propagate(wave, x) # 전파
-
Labs WFC Initialize Grid로 그리드 판을 만들고
- 이미지 로드시 1픽셀 단위로 포인트가 생성되기 때문에 주의 .
-
2D Wave Funtion Collapse 로 함수를 적용
-
Labs Wang Tiles Decorator로 포인트를 만들고
-
Copy To Point 로 Labs Wang Tiles Sample에서 미리 준비해둔 타일 조각들을 배치한다
- Piece Attribute: name
-
Blast @name==0 으로 빈칸 삭제 가능
-
Extract Silhouette의 Y축으로 하면 실루엣도 얻을 수 있음.
-
Delete Small Parts로 삐져나온것도 정리 가능
-
Labs Attribute Value Replace로 Wang번호를 게임엔진에서 사용할 문자열로 변경할 수 있다.
-
WFC Dungeon | Part 3 | Add Walls and Cliffs
- 라바랑 배치쪽은 나중에 보도록 하자
Guard Tower
-
made in Houdini 16.5 for Beginner by Kenny Lammers
-
https://www.sidefx.com/media/uploads/tutorial/indiepixel/guard_tower_project_files.zip
-
좋았던점
- 나이태 부분
- 볼트의 우둘투둘한 부분
- 콜리전 영역만들기
GROUND PART
- GUARD TOWER 1 | GROUND PART 1 | CREATING THE GROUND ASSET
- hda 만들기 : grid - uvflatten
- GUARD TOWER 1 | GROUND PART 2 | ADDING NOISE TO THE GROUND
- mountain 적용
- Point VOP로 Noise를 주고 Cd에 맵핑
- shader에 lerp값으로 사용
- GUARD TOWER 1 | GROUND PART 3 | ADDING MATERIALS WITH HOUDINI ENGINE
- UV Transform
- Scale
- Attribute Create 로 머티리얼 지정가능
- Name: unity_material
- String: Assets/Gaurd_Tower/Art/Shared_Textures/Ground/Blend_Materials/Ground_Blended_MAT.mat
- Unity 에디터 > Houdini Engine > Plugin Settings > ADVANCED > Unity Material Attribute : unity_material (기본값)
- UV Transform
WOOD WALL PART
- GUARD TOWER 2 | WOOD WALL PART 1 | CREATING A WOOD PLANK
- Box
- Group
- Group Name : $OS
- $OS : Operator String. Contains the current OP’s name. 노드 이름
- H20.5 Legacy Preset > Save As Permanent Defaults
- Group Name : $OS
- Attribute Randomize
- Poly Bevel
- Offsetting
- Distance : Scale By Attribute
- Point Offset Scale : randbevel
- Offsetting
- Point
- Attribute: Normal(N)
- VExpression: set(0, 0, 1)
- Mountain
- Point
- Attribute: Normal(N)
- VExpression: set(0, 1, 0)
- Mountain
- UV Flatten
- UV Layout
- Normal
- Cusp Angle 을 조절해서 하드/소프트 한 느낌 조정
- GUARD TOWER 2 | WOOD WALL PART 2 | ASSEMBLING THE WOOD WALL
- Type Properties > Tools > Context > TAB Submenu Path : Shape Utils/
- 만들어진 hda가지고 위로 Copy
- Translate.y : bbox("../gt_wood_plank_shape1/", D_YSIZE)
- 옆으로 Copy
- Offset용 Transform
- Clip: Keep Primitive Above the Plane
- Clip: Keep Primitive Below the Plane
- GUARD TOWER 2 | WOOD WALL PART 3 | CREATING THE WALL POSTS
- Transform
- Translate.y : -bbox("../gt_wood_plank_shape1/", D_YMIN)
- Transform
- Translate.z : -bbox("../gt_wood_plank_shape1/", D_ZSIZE) * 0.5
- 기타
- Box
- Center.y : ch("sizey") * 0.5
- Box
- Transform
- GUARD TOWER 2 | WOOD WALL PART 4 | PLACING POSTS
- Line
- Origin.x : -ch("dist") * 0.5
- Length : bbox("../wall_copy", D_XSIZE)
- Carve 로 지지대 새울 위치 조정
- Second U : 1 - ch("domainu1")
- Transform
- Translate.z : bbox("../wall_copy", D_ZMAX) + bbox("gt_wood_post_shape1/", D_ZSIZE) * 0.5
- Copy To Point
- Line
- GUARD TOWER 2 | WOOD WALL PART 5 | CREATING BOLTS FOR THE WALL
- Tube (Polygon)
- Center.y : ch("height") * 0.5
- 튜브 2개로 볼트만듬
- Tube (Polygon)
- GUARD TOWER 2 | WOOD WALL PART 6 | PLACING THE BOLTS
- 라인 활용 post에 ray를 쏴서 bolt를 Copy To Point
- GUARD TOWER 2 | WOOD WALL PART 7 | VARIATION WITH COPIES
- foreach
- Create Meta Import Node
- detail("../plank_loop_data/", "iteration", 0)
- Create Meta Import Node
- foreach
- GUARD TOWER 2 | WOOD WALL PART 8 | HI RES DISPLACEMENT
- high res 모델링
- Object Merge로 불러오고
- Blast로 영역 구분
- Wall 나이테
- VDB From Polygon
- Voxel Size : 0.002
- Convert VDB (Polygon)
- Point VOP
- Vein 으로 나무 나이테 효과
- Vein Spacing : 6
- Vein Attenuation: 1.5
- Vein Frequency : 5
- Noise Frequency : 0.5 / 4 / 2
- Display Among Normal 에 연결
- Scale : -0.005
- Vein 으로 나무 나이테 효과
- Bolt 모퉁이
- VDB From Polygon
- Voxel Size : 0.002
- Convert VDB (Polygon)
- Labs Measure Curvature
- 곡률(Curvature)을 구하고 후에 VOP를 이용 변화량에 맞게 노이즈 적용할거임
- r은 모퉁이가 될 것이고
- g는 접합부가 될꺼임
- Point VOP
- Anti-Aliased Noise
- 3D Frequency : 1.5
- Roughness : 0.6
- (Cd.r * Tubulent Noise) + Anti-Aliased Noise 계산하고
- Display Among Normal 에 연결
- Scale : 0.01
- Anti-Aliased Noise
- VDB From Polygon
- VDB From Polygon
- GUARD TOWER 2 | WOOD WALL PART 9 | HIGH RESOLUTION POSTS
- Post 기둥에 나이테효과주기.
- 윗단계처럼 옆면에 나이테 효과 주고
- 상단은 원형 나이테를 만들어주자
- Group - tops
- Keep in Bounding Region으로 윗 영역만 잡아주고
- Group Combine
- left랑 tops를 intersect해서 lefttop을 만듬
- Smooth
- Point VOP
- (Turbulent Noise + P.xz) => ripple => Cd
- Attribute Blur
- Cd
- @P.y += @Cd.r * chf("Scale")
- Post 기둥에 나이테효과주기.
- GUARD TOWER 2 | WOOD WALL PART 10 | BAKING TEXTURES IN HOUDINI
- 벽/기둥/나사에 색깔을 입히고
- Object Merge로 Low/High을 불러오고 Low, High순서로
- Labs Simple Baker
- GUARD TOWER 2 | WOOD WALL PART 11 | LAYOUT THE WALL ASSET
- curve로 영역을 만들고
- Reverse
- Attribute Wrangle(Point)
- @P.x = rint(@P.x / 2) * 2;
- @P.z = rint(@P.z / 2) * 2;
- Resample
- Length: 2
- PolyFrame 면을 따라 Point Normal생성
- Entity: Point
- Style: First Edge
- Normal Name : 체크 해제
- Tangent Name : N
- Group
- allpts
- PolyCut
- Cut Points: allpts
- Strategy: Cut
- 그 다음으로 foreach - Blast (1) - Copy To Point해서 울타리를 쳐준다.
- GUARD TOWER 2 | WOOD WALL PART 12 | COMPLETING THE WALL ASSET
- 울타리의 봉우리 뚜껑을 만들어 준다
- Curve 영역에서
- Remesh
- Group
- Include By Edges
- Enable
- Unshared Edges
- Include By Edges
- Color
- Attribute Blur
- Attributes : Cd
- Point Wrangle
- @P.y += @Cd.r * chf("Shape");
- Normal
- Point VOP
- @Cd.r * Turbulent Noise => Displace Along Normal => @P
- GUARD TOWER 2 | WOOD WALL PART 13 | SETTING UP THE WALL ASSET IN UNITY
- HDA설정
- Type Properties
- Operator Path
- Name : wallmodel
- Op Filter : Any SOP
- Operator Path
- Name : usercurve
- Op Filter : Any SOP
- Operator Path
- Object Merge
- Object 1 :
chsop("../wallmodel")
- Object 1 :
- Object Merge
- Object 1 :
chsop("../usercurve")
- Object 1 :
- 유니티에서
- UNITY_MESH
- HDA
- Unity 에디터 > Houdini Engine > New Curve Asset
- Reverse
- Unity 에디터 > Houdini Engine > New Curve Asset
Sandbag Part
- GUARD TOWER 3 | SANDBAG PART 1 | CREATING THE SANDBAG ASSET
- Subdivide
- Sculpt
- Soft Peak
- 코너 부분만 그룹으로 잡아서
- Smooth
- UV Flatten
- Flatting Contrains
- Seams에 가운데 가로로 빙둘러싼 엣지를 선택하고
- Flatting Contrains
- UV Layout
- Normal
- GUARD TOWER 3 | SANDBAG PART 2 | CREATING THE SANDBAG WALL PATTERN
- Labs Edge Group To Curve
- Group은 가운데 가로로 빙둘러싼 엣지를 선택하여 샌드백의 봉제선 모양을 만들어주자
- Thickness
- Thicken을 선택해서
- 그 다음으로 High res버전
- VDB From Polygons
- Convert VDB
- Point VOP
- @P.xz => Boxes => Displace Among Normal => @P
- Smooth
- 앞서만든 모래주머니로 울타리
- 앞에서 만든것 처럼 영역만들고 모래주머니 단을 만들어주자
- Foreach
- Resample
- Point Jitter
- PolyFrame
- Tangent Name : N
- Copy And Transform으로 단을 쌓을 포인트들을 만들어주고
- Copy Number Attribute : copynum
- Attribute Promote
- Original Name : copynum
- Original Class : Primitive
- New Class : Point
- Promotion Method : Maximum
- Point Wrangle
- 지그제그 효과
- int id = @copynum / 2;
- if (id > 2) { @P += @N * chf("offset"); }
- @P += @N * chf("push");
- Foreach
- Copy To Point로 모래주머니를 쌓자
- Labs Edge Group To Curve
- GUARD TOWER 3 | SANDBAG PART 3 | CREATING THE SANDBAG WALL ASSET
- HDA설정
- Type Properties
- Operator Path
- GUARD TOWER 3 | SANDBAG PART 4 | COMPLETING THE SANDBAG WALL
- 유니티에 배치
- 샌드백 벽에 Labs Calculate Occlusion을 추가해서 Cd에 오쿨루젼 정보를 추가
LADDER PART
- GUARD TOWER 4 | LADDER PART 1 | BUILDING A LADDER
- GUARD TOWER 4 | LADDER PART 2 | CREATING THE LADDER DIGITAL ASSET
- GUARD TOWER 4 | LADDER PART 3 | LADDER TRANSFORM FIX
- pass
- GUARD TOWER 4 | LADDER PART 4 | COMPLETING THE LADDER
- Group 유니티에서 컬리전
- Group Name: collision_geo
- Group 유니티에서 컬리전
Tower Part
- GUARD TOWER 5 | TOWER PART 1 | BUILDING THE BASE
- GUARD TOWER 5 | TOWER PART 2 | BUILDING THE TOWER HOUSE
- pass
OilBarrel Part
-
The Barrel is in there
-
GUARD TOWER 6 | OILBARREL PART 1 | BUILDING THE OIL BARREL
- pass
-
GUARD TOWER 6 | OIL BARREL PART 2 | BARREL STACKING
- 여기서는 컬리젼 영역을 만들려고
- VDB From Polygon
- Convert VDB
- Tetrahedralize( Convex Hull ) 노드를 쓰는데 해당 노드는 16.0 부터 지원을 안한다
- 대신 Shrinkwrap 를 쓰면 동일한 결과를 얻을 수 있다.
- 여기서는 컬리젼 영역을 만들려고
무료
https://learn.unity.com/project/getting-started-with-houdini-unity
- 독학.net
- TWA 후디니의 정석
- https://www.youtube.com/c/houdini3d/videos
- http://wordpress.discretization.de/geometryprocessingandapplicationsws19/2019/10/17/lecture-progress/
- 모팩
- https://anopara.gumroad.com/
- 후디니 유저인터페이스& 활용
- QuickTips Houdini 17: Visualize Pieces and Cluster with Voronoi Sops in Houdini 17
- Procedural Bridge with Houdini and Unreal Engine 4 (UE4) - Showcase
- Randomly generated procedural homes in Houdini tutorial
- [Houdini]간단한 Procedure UV
- Houdini/Ari Danesh(필수강좌)
- Houdini 30 Day Introduction to Python
- Foundation Module - The Foundation Project
Youtube Channel
P
-
Simon Verstraete
- Simon is a tech Artist that loves building procedural tools and assets.
- https://www.youtube.com/@simonhoudini5074
- https://www.artstation.com/siver
- https://siver.gumroad.com/
-
Simon Trümpler
-
Radu Cius
책
- 후디니로 구현하는 알고리즘 디자인
- 원제 : ALGORITHMIC DESIGN WITH HOUDINI HOUDINIではじめる自然現象のデザイン 소득공제
- 책 부록 소스: https://vielbooks.com/294
???
기타
- https://github.com/sideeffects/GameDevelopmentToolset
- https://github.com/wqaetly/HoudiniSamples
- https://houdinifx.jp/blog/gamedev-texture-sheet-%e3%81%ab%e3%81%a4%e3%81%84%e3%81%a6/
- https://blog.naver.com/edgerider/220602291985
- https://microbot.ch/new/procedural-building-modules/
- https://blog.naver.com/marnich/221659754394
- https://www.orbolt.com/
- Create, upload, and share Houdini Digital Assets
etc2
-
cascadeur - deep learning pose predication tool
-
하운드13의 '프로젝트 M'의 처절한 전투를 표현하기 위한 언리얼 엔진 활용법 | 언리얼 서밋 2021
- 블러드 이펙트
-
언리얼 서밋 | 2020 | TA가 구현해본 대규모 캐릭터 시스템 - 1,000개의 캐릭터가 끊김없이 나오게 만들기
- 언리얼LOD생성 퀄리티가 낮아 LOD생성을 후디니에서 함
-
에픽 라이브 | 러셀 | UE5에서 한국적인 아파트 절차적으로 생성하기
- 번외 후디니가 아닌 블루프린트 만으로 절차적 생성
-
에픽 라이브 | 언리얼 엔진 이펙트에 후디니 활용하기
-
- 후디니 케릭터 모델링
Copmany
- SEGA (용과 같이)
- 폴리포니 디지털 (그란 투리스모)
- https://blog.toylogic.co.jp/tag/houdini
- https://academy.cgworld.jp/contents/search?q%5Bkeyword%5D=houdini
GDC
- HIVE2021 Procedural Systems for "Marvel's Spider-Man: Miles Morales" and "Ratchet & Clank: Rift Apart" (Presented by Houdini)
- GDC25 Tool Development Stories from the Game Tools Team at Houdini (Presented by Houdini)
- GDC25 Tencent Games Developer Summit: The Procedural Way: Reconstruct Mega City of Qin Dynasty (Presented by Tencent Games)
- Video games Created using Houdini
person
LUIZ KRUEL
- https://www.luizkruel.com/
- GDC2017 - Technical Artist Bootcamp: Introduction to Proceduralism
- GDC 2018 - Game Development Tips and Tricks | Luiz Kruel
- "Game" Development Tools | Luiz Kruel | SIGGRAPH 2019
多喜 建一 타키켄이치
Erik Hallberg
-
Subdivision
- 마스터하기 어려움
- 토폴로지에 대한 이해
-
Zbrush
- Dynamesh, Polish
- 파괴적
로우폴리 작업 하이폴리 대비 만들기 쉬움 UV작업 쉬움 하이폴리에서 로우폴리로 전환시 날카롭거나 평평한 면이 뭉개지는 경우가 있음. 불린작업 원통형 나사 원형 패임 나사 생성 나무 덧댈 영역 + 나무 조각낼 평면 용접할 영역이 있는 박스 손잡이의 주름영역 접합부 casting seam 커스텀 UV 함수 sharp edge 분리 - 보기 좋은 노말맵 만들기 위해 Torus/pipe에서 적절한 seam 찾기 외곡된 uv는 따로 분리해서 경계지점을 찾고 최단거리로 자름 기울어진 uv영역은 서로 평행이거나, 가장긴 직선을 찾아내서 기울임 제거 머티리얼, 크기, AO가능 여부를 판별해서 uv영역 겹치기
Paul Ambrosiussen
- https://www.youtube.com/@paulambrosiussen/videos
- https://www.ambrosiussen.com/work-1/tooldev
- https://www.sidefx.com/profile/Ambrosiussen/
- Python States for Houdini TDs
- Game Development Made Easy Using Houdini | Paul Ambrosiussen | GDC 2018
- Rapid Level Creation for Unity Mobile | Paul Ambrosiussen | GDC 2019
- WaveFunctionCollapse Supercharged with PDG for Level Generation | Paul Ambrosiussen | HOUDINI HI...
- Python States | Paul Ambrosiussen | Games Workshop
이규영
- https://www.artstation.com/peter_k_lee
- https://blog.naver.com/furyedea255
- [게임] RP7의 아트 디렉션과 파이프라인 | 언리얼 서밋 온라인 2022
- 블리자드 배경아티스트 귬규영 -2부-
Matthew Vitalone
Radu Cius
viktors anfimovs
Luis Garcia
- Procedural Art for Indies // Luis Garcia // GDC 2017
- Simplifying Indie GameDev Workflows | Luis Garcia | GDC 2019
// ref: https://www.emilsvfx.lv/blog/hou_rope_vex/

vector A = point(0, "P", 0);
vector B = point(0, "P", @numpt - 1);

float L = 12.8;
float gravity = chf("gravity", 0.5);

float d = distance(A, B);
if (L < d)
{
    warning("Rope too short!");
    return;
}

int pt = @ptnum;
if (pt == 0)
{
    @P = A;
    return;
}

if (pt == @numpt-1)
{
    @P = B;
    return;
}

float t = float(pt) / float(@numpt-1);
vector pos = lerp(A, B, t);

// Apply sag with gravity control
float sag = sin(t * PI) * (L - d) * gravity;
pos.y -= sag;

@P = pos;
Juanjo Martínez
NIKOLA DAMJANOV
- https://www.artstation.com/nikoladamjanov
- COPs Mega File
- THE COMPLETE A-Z TERRAIN HANDBOOK
- EPC2022 | Nikola Damjanov | Living Procedurally
adrienlambert
- https://adrienlambert.gumroad.com/
- https://www.youtube.com/@AdrienLambertvfx/
- UVs LAST HOPE / Houdini Indie HDA
- How not to suck at Python / SideFX Houdini
- Tutorial series - Procedural Cliffs with SideFX houdini
Timucin Ozger
- https://www.artstation.com/timucinozger/
- https://www.youtube.com/@StudioOriented
- https://www.timucinozger.com/
Sean Gobey
- https://www.artstation.com/seangobey
- https://x.com/SeanGobey
- https://seangobey.gumroad.com/
- You’re Probably Lighting Wrong: Physically Based Lighting in UE5 | Unreal Fest Gold Coast 2024
- You're probably modelling wrong: A guide to creating billion polygon worlds
Peter Hanshaw
TA
팁
FBX 머티리얼별 색칠
파일로 fbx불러오고 파티션 Rule : $MAT하면 머티리얼별로 그룹이 생김. Color로 해당 그룹 색칠
점 선 면
면/선 => 점 Add - Delete Geometry But Keep the Points
면 => 선 Ends - Close U: Unroll with New Points Convert Line
선 => 면 Skin
Poly Fill
아이콘모양 변경 유지
C/Z로 컬러/모양을 띄우고 Ctrl을 누른후 드래그 드랍으로 노드를 변경하면 나중 노드들도 반영됨.
자동 저장 횟수
- 기본값 1분으로 되어있다. 바꾸려면
- Edit > Preferences > Save and Load Options > Auto Save Every x Minutes
이전 버전 노드가 안보일때는
- Assets > Asset Definition Toolbar > Show Always
- 예)
- Curve
- Lab Cylinder Generator
Color correction
- 감마: Edit> Color Settings> Color correction> Gamma> 1
Circle을 사용한 각도설정
- copytopoint로 circle을 점에 붙인다
- carve의 U를 이용 각도를 가진 점을 얻고 - 포인트가 0부터 시작하는걸 변하게 하는게 좋을듯
- 점과 점을 merge
- add로 선을 이어주자 - polygons > By Group
어트리뷰트 비쥬얼라이제이션
- 포인트 번호 표시해주는 툴바에 visualization 우클릭
디버그용 선을 이어보기
- 어트리뷰트를 이용하여 정보용 점을 추가로 만들고
- merge
- Add> By Group> Add> By Attribute> Attribute Name 설정
grid를 텍스쳐로 굽기
- https://blog.naver.com/checkjei/222622327344
- geo > grid / uvtexture / attribvop
- Material Palette
- Principled Shader 드래그
- 드래그된것 우클릭 파라미터 편집 색 조정및 기타 러프니스등 조정
- Network view 탭에서 out
- baketexture 노드 생성
- UV Object1에 geo노드 등록
- Surface Unlit Base Color (basecolor) 선택
- Render to Disk 버튼 클릭
유니티 소스 컨트롤
- https://www.sidefx.com/docs/houdini/unity/sourcecontrol.html
/heu_session.txt : 현재 세션 정보를 저장하는 데 사용하는 임시 파일 - .gitignore 할것
/heu_settings.ini - 이 파일에는 플러그인의 설정이 들어 있습니다
- 폴더
- Assets/Plugins/HoudiniEngineUnity/ : 플러그인
- Assets/HoudiniEngineAssetCache/Working/
- 캐쉬폴더라서 사용자간 작업공유 안할꺼면 버전관리 안해도됨.
- 캐쉬라서 베이크안하면 날라감.
- HoudiniEngine ▸ Plugin Settings ▸ GENERAL ▸ Houdini Asset Cache Path 해서 사용자별 버전관리해도 좋을듯
- Assets/HoudiniEngineAssetCacheBaked/
- 여기는 HDA에서 베이크된 에셋 파일이 생성되는 곳. 버전관리 해야함.
두 점 가운데에 점 찍기
- subdivide로 가운데 점 찍고
- delete
- Operation: Non-selected
- Entity: Point
- Number
- Operation : Delete by Range
- Start/End : 1
- Select _ of _ : 1 / 3
- 지붕 널 만들때
- remesh로 포인트 늘려주고 point jitter로 흩트려주면 좋음
- Lattice 사용
- 집 휜거 나타낼때
- Bound를 잡고 임의의 Box로 가운데 점들을 그룹핑해서 Edit으로 휘어주고
- Lattice를 사용해서 적용
- 지붕 휜거는
- Bound를 잡고 지붕마루 맡닿은 선을 polywire와 transform으로 영역을 만들어 그룹핑해서 Edit으로 휘어주고
- Lattice를 사용해서 적용
- 집 휜거 나타낼때
- 건물에 인접한 점과 그렇지 않는 점
- Attribute TransferDistance Threshold로 구할 수 있음.
- 텐트모양
- Box에 Facet(Post-Compute Normal)로 노말을 주고, Group(Keep By Normal)로 상단점을 선택후 Wrangle(@P.z = 0;)로 가운데로 뭉치고 Fuse로 중복을 없에 텐트모양을 만든다.
백틱(``) : 이름 활용 예제
example_`rint(fit01(rand(detail("../foreach_begin2_metadata1/", "iteration", 0)), 1, 5))`
성능 모니터
- Performance monitor pane
- https://www.sidefx.com/docs/houdini/ref/panes/perfmon.html
- Windows > Performance Monitor Alt + Y
이동/회전 행렬 활용
// matrix  maketransform(int trs, int xyz, vector t, vector r, vector s)
// matrix  maketransform(vector zaxis, vector yaxis, vector translate)

matrix location_matrix = maketransform(
    XFORM_TRS,
    XFORM_XYZ,
    p0,
    {0, 0, 0}
);
matrix rotation_matrix = maketransform(right, world_up, {0, 0, 0});
matrix m = rotation_matrix * location_matrix;

@P = invert(m);
@P = m;
상단 면 중앙에 점 찍기
- vex 방식
if (@N.y > 0.1) { string prim_str = itoa(@primnum); vector center = getbbox_center(0, prim_str); addpoint(0, center); } - 노드 방식
- blast/name/foreach(primitive)/extractcentroid 방식
카메라를 통한 디버그 메시지 보여주기
- 카메라노드에서 Edit Render Properties
- Viewport Display > OpenGL View > Viewport Comment 추가해서 내용 입력하면 씬뷰에서 나타남. (``을 사용하여 vex코드 삽입가능)
분홍색 마크
- Display Option : Marker
- Set display option for : Tempalte Model Geometry 설정 바꿔주면 분홍색 마크시 보여지는거 달라지게 됨.
점/선 크기조절
- 점
- Display Option : Guide
- Guide Size > Point marker size
- Display Option : Guide
- 선
- Display Option : Geometry
- WireFrame > WireFrame Width
이미지 카메라 매칭
- Houdini Image Camera Matching
- houdini Perspective Match
- https://pixabay.com/photos/lost-places-hall-columns-pforphoto-2963764/
- https://fspy.io/
- https://www.andre-gaschler.com/rotationconverter/
- Input angle format / Output angle format을 Degree로 설정
- 이미지를 fspy로 불러와서 앵글을 잡는다
- Vanishing points axes
- 1 : x
- 2 : -z
- Vanishing points axes
- 후디니
- 카메라 View
- bacgkround image에 이미지 깔아주고
- resolution에 fspy Image Width/Height
- aperture에 fspy Focal length - Sensor.x
- Focal Length에 fspy Focal length - Value (mm)
- 카메라 Transform
- Translate:
- fspy Camera position x/y/z
- Rotation
- fspy의 Camera Orientation (Axis angle (degrees))를 rotationconverter에 복사(x/y/z/angle)
- rotationconverter의 Axis with angle magnitude (radians) [x, y, z]
- Translate:
- 카메라 View
- https://github.com/Njordy/nLib
HOUDINI_PATH
- New Pane Tab Type > Misc > Textport
- echo $HOUDINI_PATH
- New Pane Tab Type > Python Shell
- hou.getenv("HOUDINI_PATH")
- hou.houdiniPath()
뭔가 쌓인 효과
- Bound
- Lower Padding : 적절히(0.1)
- Upper Padding : 적절히(0.1)
- Group & Blast
- 윗 영역을 구하고
- point N을 {0, -1, 0}
- Scatter로 뿌려질 점들을 만들어주고
- Ray로 원래 물체로
- Ray Hit Group : rayHitGroup
- Blast : rayHitGroup
- Fuse
- VDB From Particle
- Distance VDB 해제
- Fog VDB
- Point Radius Scale 올리고
- Minimum Radius in Voxels 낮춰주고
- VDB Smooth
- Volume VOP 으로 노이즈 주고
- Convet VDB로 폴리곤으로
- Poly Reduce
- Normal
라인의 양쪽 선 구하기
- Sweep
- Surface Shape : Ribbon
- Columns : 1
- Add
- Points : Delete Geometry But Keep the Points
- Polygons / By Group
- Add : Skip every Nth point
- N : 2
나무 가지에 뭔가 걸치기
- Shrinkwrap로 나무 영역을 구해보고
- Remesh to Grid로 잘개 쪼갠후
- Attribute Blur로 부드럽게 해주자
- Clip 으로 나무 기둥만큼 잘라주고
- Scatter로 점뿌리기
- Attribute Randomize로 속성 조정
- ex) pscale, Cd
- 그 다음 Copy to Point
TODO
-
blast
- @N.y=0
- @P.y=0
- @grp_a=hello
-
공유된거
- Group - Include by Edges - Max Edge Angle 조절
- Divide - Remove Shared Edges
vex연습
-
chramp로 그리고 chi갯수만큼
- point 추가
- primitive 추가
-
pivot
- bbox(opinputpath(".", 0), D_XSIZE)
- bbox(opinputpath(".", 0), D_YSIZE)
- bbox(opinputpath(".", 0), D_ZSIZE)
-
uv project 1
- wrangle ( detail )
vector size = getbbox_size(0); if (size.x > size.z) { @project_size = size.x; } else { @project_size = size.z; }
- uv project
- translate
- centroid(opinputpath(".", 0), D_X)
- centroid(opinputpath(".", 0), D_Y)
- centroid(opinputpath(".", 0), D_Z)
- scale
- detail(opinputpath(".", 0), "project_size", 0)
- translate
주의
- 파라미터에서 그룹과 관련된 수식 넣을때 주의
- Blast// Group:
@Cd.r==0와@Cd.r == 0과는 다름
- Blast// Group:
- 그룹 날라가는 노드
- Carve
그룹
| 타입 | 프리픽스 | 예시 |
|---|---|---|
| primitive | gr_pr_ | gr_pr_building, gr_pr_tree |
| point | gr_pt_ | gr_pt_crowd, gr_pt_dust |
| vertex | gr_vt_ | gr_vt_borders, gr_vt_seams |
| edge | gr_ed_ | gr_ed_support, gr_ed_bevel |
trouble shoot
- HeightField에서 흰색판이 보이는 문제
- 벌칸렌더러의 문제로 보임
- Edit > Preferences > 3D Viewports
- Renderer : OpenGL 로 변경. 단, OpenGL로 변경시 변경사항이 잘 반영 안된다던지 다른 쪽에서 Viewport문제가 발생할 가능성이 있음.
나선형(Helix)
- Point Wrangle : @N = {0, 1, 0};
- Resample
- curveu
- Poly Frame
- tangentu
- tangentv
#include <math.h>

float resolution = chf("resolution");
float radius = chf("radius");

float u = fit01(@curveu, -PI, PI) * resolution;
vector pos = set(sin(u), cos(u), 0) * radius;
matrix3 t = set(v@N, v@tangentv, v@tangentu);

@P += pos * t;
- UV Texture
- Texture Type: Uniform Spline
- Attribute Class : Point
- Polyextrude
- Transform Extrude Front
- Translate 조절
- Point Wrangle
- @uv.y = 1;
환경맵 설정
- 라이트
- Light 오브젝트
- Environment Light 오브젝트 ( 환경맵도 가능 )
- $HFS/houdini/pic 쪽에 이미지 들이 있음. hdri라든가
- 환경맵 추가후 뷰포트에서 No cam > Look Thought Light > envlight 선택
- 뷰포트에서 Persp > Perspective로 Orthographic 전환 가능
- Display Options
- 반사가 자글거릴텐데 Display Option > Lights > Light Sampling의 수치를 늘리면 됨.
- 기본값 8. 올려도 많이 만족할만큼 개선되지는 않는데. 그래도 올리는게 나음.
- 백그라운드 이미지는 Display Options > Background > Persp > Disk File에 선택하는 곳이 있음
- 반사가 자글거릴텐데 Display Option > Lights > Light Sampling의 수치를 늘리면 됨.
노드
Add
- 포인트 추가
- 포인트 제거
- Polygons / Remove Unused Points
- 포인트만 남기기 - 내부 선 지우기
- Points / Delete Geometry But Keep the Points
- 선만들기 - 점을 선으로 잇기
- Polygons / By Group
- 면만들기
- Polygons / By Group
- Closed 체크
- Polygons / By Group
Transform
- translate: -$CEX / -$CEY / -$CEZ
- vex에서는 vector cent = getpointbbox_center(0);
- 바닥에서 띄우기
- translate.y : -$YMIN
Box
- Center.y : ch("sizey") * 0.5
Line
width line (x dir) 보통 sweep이랑 같이 쓰임
- Origin.x : -ch("dist") * 0.5
- Direction: 1/0/0
Tube
바닥붙이기
-
Center.y : ch("height") * 0.5
-
아니면 Transform 하나 써서
- translate.y : -$YMIN
Grid
평면상에서 점 흐트리기
- Grid
- Attribute Expression
- Attribute : N
- VEXpression: @P
- Mountain
Carve
First U랑 Second U를 동기화
- Second U : 1 - ch("domainu1")
선에서 가운데점만 뽑기
- First U : 0.5
- Extract 탭 선택
Group
Group의 이름을 노드의 이름으로
- Group Name : $OS
- $OS : Operator String. Contains the current OP’s name. 노드 이름
- H20.5 Legacy Preset > Save As Permanent Defaults
선 양끝
- Group by Range
- Group Type : Point
- Start:1
- End:1
- Invert Range
- Connectivity
- Affect Disconnected Geometry Seperately
- Group Type : Point
Foreach
iteration 숫자 가져오기
- Create Meta Import Node
- detail("../foreach_begin2_metadata1/", "iteration", 0)
Switch
Foreach의 iteration 숫자 가져다 쓰기
- rand(detail("../foreach_begin2_metadata1/", "iteration", 0)) * opinputs(".")
첫번째는 기본, 두번째는 Object Merge로 가져다 쓸때
npoints(1) > 0 로 포인트가 있으면 Object Merge를 가리키도록
Poly Frame
선의 Tangent를 노말을 할당해서 노말이 선따라 가게
- TangentName: N
Orient Along Curve
- Frame
- Tangent Type : Next
- Tangent Up Vector : Y Axis
라인에 있는 점 지우기
- Facet으로 Remove Inline Points 하거나
- Refine으로 Unrefine탭 사용
정리
Fuse Facet Dissolve Labs Dissolve Flat Edges Divide // Remove Shared Edge 옵션 Remove Shared Edge // Divide 랑 같음
띄엄띄엄 선
- 라인을 Resample
- Convert Line으로 점사이를 primitive로 변환
- Carve
- First U: 알아서 조절
- Second V: 1-ch("domainu1")
라인에 원하는 수만큼 점 추가
- Resample
- Maximum Segment Length 체크해제
- Maximum Segments 체크하기
링형을 sweep시 시작-끝을 부분이 끊기는 현상 해결 (Open Curve Issue)
-
방법 1
- 시작-끝 부분을 이어버리는것
- Fuse / PolyFrame / Sweep
-
방법 2
- 시작-끝 부분의 노말을 동기화
- PolyFrame 으로 선의 Tangent를 노말을 할당해서 노말이 선따라 가게하고
- TangentName: N
- Wrangle (detail) 로 끝점의 노말을 시작 점의 노말로 셋팅한다
vector first_N = point(0, "N", 0); int last_pnt = npoints(0) - 1; setpointattrib(0, "N", last_pnt, first_N); - Sweep
-
원인
- Fuse를 안했거나
- Ends에서 Unroll with New Points로 새 포인트를 넣을 경우
링 2개 사이 채우기
링 하나가 프리미티브 하나라고 가정
- Group: Edges 으로 A/B를 지정
- Merge
- Poly Bridge
- Group : A
- Divide Into : Individual Elements
- Reverse Winding
- Group : B
- Divide Into : Individual Elements
- Reverse Winding
- Group : A
라인 점에서 선마다 프리미티브 붙이기
- Convert Line을 사용하거나
- Carv를 이용함
- First U : 0
- Second U : 1
- Break Points
- Cut At Internal U Breakpoints
스택
- Copy And Transform
- Translate.y : bbox(0, D_YSIZE)
UV Texture
Texture Type : Arc Length Spline Attribute Class : Point Scale.x : arclen(0, 0, 0, 1)
Poly Wire
Edit Parameter Interface - Ramp(wradious)랑 Float(radious_mult)추가하고 Wire Radious: chramp("wradious", $BBY, 0) * chf("radious_mult");
에너지실드같은 벌집모양
Sphere만들고, Divide에서 Compute Dual체크
RBD
- 글자같은건 RBD Pack 하면 좋음
- RBD Bullet Solver 에서 Collision - Ground Collision: Ground Plane 가 있음.
랜덤하게 Copy to point
- Copy Random objects to points in Houdini 19
- 일단 뿌릴 오브젝트들을 merge시키고
- Assemble
- Piece Attribute: piece
- 그리고 포인트 쪽에는 Attribute From Piece
- Piece Attribute: piece 를 하면 준비 완료
- Mode: Circle/Noise/Random 등등
Vex
자잘한 팁
- switch같은곳은 작아서 Ctrl+E로 확대해서 편집하자
- if(a==b, 1, 2) 같은 식으로 넣을 수 도 있음.
Ramp이용한 프로파일
1번 오리지날
int point_arr[];

float profile = chramp("profile", 1);
int pointCount = chi("./profile");

for (int i = 1; i <= pointCount; ++i)
{
    float p_pos = ch("./profile" + itoa(i) + "pos");
    float p_val = ch("./profile" + itoa(i) + "value");
    int new_point = addpoint(0, set(p_pos, p_val, 0));
    append(point_arr, new_point);
}

addprim(0, "polyline", point_arr);
2번 - 간편
// 간편한 버전 Line - Resample 후
float perc = (float)@ptnum / (@numpt - 1);
float ramp = chramp("ramp", perc);
@P.y = y;
현재 노드 이름
string current_node_name = split(opfullpath("."), "/")[-1]; // $OS
라인에서 사이 각 구하기
int ptnum_prev;
int ptnum_next;

int ptnum_last = npoints(0) - 1;
if (@ptnum  == 0)
{
    ptnum_prev = ptnum_last;
    ptnum_next = 1;
}
else if (@ptnum == ptnum_last)
{
    ptnum_prev = ptnum_last - 1;
    ptnum_next = 0;
}
else
{
    ptnum_prev = @ptnum - 1;
    ptnum_next = @ptnum + 1;
}


vector pos_prev = point(0, "P", ptnum_prev);
vector pos_next = point(0, "P", ptnum_next);

vector dir_prev = normalize(@P - pos_prev);
vector dir_next = normalize(@P - pos_next);

float angle = degrees(acros(dot(dir_prev, dir_next)));
라인 방향 설정
// 일단 PolyFrame사용해서 Tangent:N 설정해주고,
// Wrangle(poitn)후 Visualize의 Marker&Vector로 right은 빨강, up은 초록

vector dir = @N;
dir.y = 0;
dir = normalize(dir);
v@right = cross(dir, {0, 1, 0});
v@up = cross(v@right, @N);
find_reveresed_prims
vector nrm = primuv(0, "N", @primnum, {0.5,0.5,0});
if(nrm.y < 0)
{
    i@group_reverse = 1;
}
0 ~ 1 구간 반복
float y = abs((x % 2) - 1);
엇갈려서 선을 이을때
//아니면 그냥 Connect Adjacent Pieces도 고려해볼것

vector p1_arr[];
for(int i = 0; i < npoints(0); i++)
{
    vector p1 = point(1, "P", i);
    append(p1_arr, p1);
}

for (int i = 0; i < npoints(0); ++i)
{
    int idx = i + 1;
    if (idx == npoints(0))
    {
        idx = 0;
    }

    vector p1 = p1_arr[idx];
    int newpt = addpoint(0, p1);
    addprim(0, "polyline", i, newpt);
}

return;

// 역방향일 경우
// - 위 vex에서 1번을 sort노드로 shift의 offset을 -1로
// - 아래 vex를 사용
for (int i = 0; i < npoints(0); ++i)
{
    int idx = i - 1;
    if (idx < -1)
    {
        idx = npoints(0) - 1;
    }

    vector p1 = p1_arr[idx];
    int newpt = addpoint(0, p1);
    addprim(0, "polyline", i, newpt);
}
선 - 연결선
- 전깃줄같이 선 연결시 Vex로 안할 시 양끝단의 점에 bevel써주면 좋음
- foreach를 돌고 끝단을 그룹핑하며 나중에 Bevel.
// vex: 전기선 v1
// ref: 3dbuzz - Houdini bridge contest - Houdini Bridge lesson09 cables 3 (10/13)
//     - https://www.youtube.com/watch?v=qIow2RgooII
// 현수교 같은곳에서 쓰면 됨.(양 끝점을 제어할 수 있음.)
// - line을 길게해서 놔두고 resample해서 사용.

float height = chf("height");
float valA = chf("valA");
float valB = chf("valB");
float arcVal = chf("arcVal");

float perc = @ptnum / (@numpt - 1.0f);

float x = valA * (1 - perc);
float y = valB * perc;
float z = -arcVal * (1 - perc) * perc;
float offsetPerc = x + y + z;

vector p = @P;
p.y = offsetPerc  * height;
@P = p;
// vex: 전기선 v2
// 전기선처럼 간편하게 사용할때.
// - 점 0 1 2로 이루어진 선에서 Group 1로 해서 1번 점만 내린다
// - 후에 Resample - Subdivision Curves로하면 글럴싸해짐

float seed1 = chf("seed");
float seed2 = chf("seed"); // detail(1, "iteration",0);
float min = chf("min");
float max = chf("max");
float amount = chf("amount");

float rand = rand(seed1, seed2);
float fit = fit01(rand, min, max);

@P.y -= (amount + fit);
선 - 현수선(catenary)
-
https://en.wikipedia.org/wiki/Catenary
-
https://lbcc.pressbooks.pub/structuraldesign/chapter/chapter-4-catenary-cables-and-arches-2/
-
y = a * cosh(x / a)
- a : 스케일
- x : 가로 위치
- y : 세로 위치
// vex: catenary v1
// primitive wrangle

int thesepoints[] = primpoints(0, @primnum);
vector startPos = point(0, "P", thesepoints[0]);
vector endPos = point(0, "P", thesepoints[1]);

int numPoints = 30;
float distance = distance(startPos, endPos);
float tension = chf("tension") * fit(rand(@primnum), 0, 1, 0.9, 1.3);

int pass = 0;
int newpoints[];
for (int i = 0; i <= numPoints; ++i)
{
    float t  = fit(i, 0, numPoints, -1, 1);
    float t2 = fit(i, 0, numPoints, 0, 1);
    float x  = t * distance;
    float y  = (cosh(x / tension) - 1) * tension;
    vector pointPos = lerp(startPos, endPos, t2);
    float baseline = (cosh(distance / tension) - 1) * tension; //offset at begining of curve
    pointPos.y += y - baseline;
    pass = addpoint(0, pointPos);
    append(newpoints, pass);
}
addprim(0, "polyline", newpoints);
removeprim(0, @primnum, 1);
hyperbolic cosine
// vex: catenary v2
// point wrangle
// ref: https://crudo.dev/docs/houdini-collection/catenary/

int numvtx = primvertexcount(0, @primnum);
float cuv = vertexcurveparam(0, @vtxnum);
float curve_length = primintrinsic(0, "measuredperimeter", @primnum);

float x = fit01(cuv, -curve_length / 2, curve_length / 2);
float random_seed = chf("random");
float a = chf("A") + (rand(@primnum + random_seed) - 0.5) * chf("random_amplitude");
a = max(a, 0.1);
float gain = chf("gain");

float y = -1 * gain * (a * cosh(x / a) - a * cosh(curve_length / (2 * a)));

v@P.y -= y;
플러그인
Recipes
Recipes: saving and recreating node and parameter presets
Windows > Recipe Manager
%HOME%/houdini{version}/otls/Recipes.hdanc
노드 선택 > Recipes > Save Selected Items as Tool... > Save Selected Items as Decoration... > Save Node Preset...
tools decorations parameter presets
Baking Sexy Recipes | Attila Torok | Houdini 20.5 HIVE Paris
Getting Started with Recipes | Houdini 20.5
단어장
후디니
| bevel | 비스듬한 면 | 노드 |
| seam | 경계선, 이음매 | |
| Lattice | 격자, 격자모양 | 이 노드로 공간 왜곡같은 효과 주는게 가능 |
| cusp | (두 곡선이 만나는 뾰족한) 끝 | Normal 노드에서 angle 조절 |
| vein | 정맥, (식물의) 잎맥, 돌결, 나뭇결 | Point VOP에서 사용가능한 노드 |
| subdivision | 다시 나눔, 세분 | 노드 |
| Curvature | 곡률 | Labs Measure Curvature노드 |
| Tubulent | 난류 - 유체의 흐름이 바르지 않고 상하좌우로 섞이면서 흐르는 것 | Tubulent Noise |
| intrinsic | 내재적인, 고유의, 본질적인 | |
| shrink wrap | 수축 포장 | 노드 |
| Vellum | 양피지 | ex) Vellum Hair 노드 |
| Wedge | 쐐기 | TOP |
| erode | 침식/풍화 되다 | |
| slump | 침체/무너진 | |
| sediment | 침전/퇴적물 | |
| debris | 지형이 무너질 때 생기는 잔해/쓰레기 | |
| bedrock | 기반/기반암 | |
| sweep | 쓸기/ 휘두름 |
crease - 주름, 주름이 생기게 하다
Ledge - (벽에서 튀어나온) 선반, 돌출부. Beam - 기둥 Truss - 트러스(지붕·교량 따위를 버티기 위해 떠받치는 구조물) Pillar - (다리·건물 지붕 등을 받치는, 특히 장식 겸용의 둥근) 기둥 Plank - 널빤지 Shingle - 조약돌, 지붕널, 대상 포진 Chimney - 굴뚝 annual rings, tree ring - 나이테 Foliage -
profile - 윤곽, (얼굴의) 옆모습 Skew - 왜곡하다, 비스듬히 움직이다
직각삼각형 right-angled triangle 밑변 B base 빗변 H hypotenuse 수직 P perpendicular
topology 폴리곤 구조와 배열 retopology 토폴리지 재구성 principled - 절조 있는, 원칙에 입각한
ridge - 등 / 봉우리 / 튀어나온 부분
Angle of repose : 안식각, 휴식각 또는 임계 안식각. 이 각도에서 경사면의 재료는 미끄러지기 직전이다.
spherify - 구형화하다 trunk - 나무의 몸통
- isosurface
- 등치선의 3차원 형태이며, 3차원에서 일정한 스칼라 값(예: 압력, 온도, 속도, 밀도)을 갖는 점들의 모임을 나타내는 연속된 표면이다. 등가면은 컴퓨터 그래픽의 주요 주제이며, 특히 전산 유체 역학에서 시각화 방법으로 자주 사용된다.
- iso- → 같다, 동일하다 (equal)
- surface → 표면, 면 (surface)
- 그래서 isosurface란 → "어떤 3D 공간 안에서 특정 값이 동일한 지점을 연결한 면" 을 말해.
isometry - 등거리 변환 sliver - (깨지거나 잘라 낸) 조각 - Divide 노드
pre (미리) + fabricated (제작된)
skirt 1. (가장자리를) 두르다 dilate - 확장[팽창]하다[시키다], 키우다[커지다] Splat - A splat map is a texture which controls blending of multiple textures (or other values) across a model. scaffolding 높은 곳에서 작업할 수 있게 가설(임시로 설치)한 플랫폼 혹은 구조물
Rebar (철근) Steel Reinforcement (강철 보강재) Reinforcing Bar (보강 바) concave - 오목한 (↔convex) concavity - 오목함
chipping - a small fragment of stone, wood, or similar material
| HOUDINI ENGINE | ||
|---|---|---|
| for Unity/Unreal | .hda | 최대 10개 |
| INDIE | .hda .hdalc | 최대 3대 |
| EDUCATION | .hda .hdalc .hdanc | |
| APPRENTICE | X |
- https://www.sidefx.com/docs/houdini/unity/
- https://github.com/sideeffects/HoudiniEngineForUnity
- https://www.sidefx.com/download/daily-builds/
- https://www.sidefx.com/products/compare/
APPRENTICE
- Houdini Engine for Unity 사용 안됨
- 렌더링 시 1280x720으로 제한
| FBX | Import |
| Alembic | Import |
| .bgeo | import/export |
| .obj | import/export |
Houdini Engine Plug-ins x Create Assets for Engine x